Saturday, October 31, 2020

12 Kits guest design

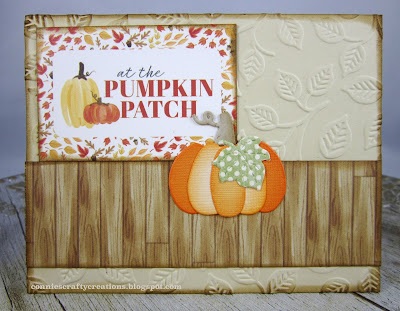
 Hello all, I am glad you stopped by today, I have a lot of cards to share today. Birgit is the Hostess this month for 12 Kits of Occasions blog and she asked me if I would like to play along in Octobers kit and it didn't take me long to say yes, this being my favorite time of year, I knew this would be a fun kit to play along with and I loved it.


This first one had some great pumpkins to color and I loved the papers and die cut leaves and tag!


The kit had some great sentiments and this cute barrel to put the apples in, I just colored the bands around the barrel with silver pen and added some glossy accents on the apples you can see in the photo below,


I loved this layered pumpkin and the cute pattern in the leaf, I just added an embossed background.


I loved this sentiment on this one, so I used up all the rest of the die cut leaves with it, Framing the sentiment with my Hero Arts wood frame die.


I loved this leaf, and the sentiment went perfect with it!


Another great image and lovely papers!

Lastly I had to color up this adorable image, I messed up stamping my own sentiment that I thought went great with this image, so I stamped it again, fussy cut it out and placed over my boo boo.


Thanks for sticking with me on this long post, as you can see I had fun with it and have more I can use.

Thanks so much Birgit for thinking of me for this guest spot, it was so fun, now we all need to go over and see what the rest of the girls have done with this kit!

Thanks so much for stopping by today!

Connie

Wednesday, October 28, 2020

Your Day

 My sister gave me a packet of tags that have messages on them but I didn't want to use the message on it so the part with the sentiment I just covered up with an image of my own, then added my own sentiment and swirl underneath.


Autumn leaves - Bird stamp, colored w/markers
Paula Deen - tag
D.R.S. design- easy grass background stamp
Distress inks - Mowed Grass and Tumbled glass
Studio G - sentiment and swirl stamps
Creative Imaginations - Olive Flocked Brad
Leaf gems


Thanks so much for taking the time to stop by and say Hi,

Connie

Monday, October 26, 2020

Gel plate

 My stamp group this month tried out working with a gel plate in our zoom meeting. I had to go buy one, I found the last one Hobby Lobby had. I have been admiring what others have done creating with a gel plate and so I was quite excited about giving it a go, I did not try it out first before our meeting but I had watched some video's ahead of time so I kind of knew what we would be doing.

I had not checked my paints ahead of time and when I went to use them they were a mess, all that would come out was water and so I was a bit behind the rest until I got everything set straight so I did do some things wrong and I think I used to much paint, it is one of those projects that you need to get the right amounts to get good results, I am happy with a couple of them and hope to share later but first I am sharing one of the first steps that we did and we did it on scrap paper but I liked how it turned out so I used it on this card for my friend.

I couldn't tell you what color paints this was, no time to figure all that out.  We mixed the different paints onto the gel plate, then laid a stencil on top and then laid our paper on top to get the first impression.  When I went to make the card I added some old paper distress ink over the whole sheet and then went around the edges with gathered twigs ink.


I stamped and colored the flowers and leaves and fussy cut them out, they seemed to get lost in the pattern underneath so I wanted to have a base for it but I wanted it in brown tones and then I remembered I had used tea bags I saved, so I cut out a die with it and it worked to place my arrangement.  The butterfly was from another project I had done earlier,


Gel plate background using paints
Folk art stencil - Lovely Floral
Distress inks - Old paper and Gathered twigs
Bobunny - Flower garden stamp set, colored w/ markers and fussy cut
Spellbinders - Picot edge circle die w/used tea bag
Butterfly stamp, fussy cut
Liquid pearls


Thanks so much for taking the time to stop by today, have a fantastic week!

Connie

Saturday, October 24, 2020

Unstoppable

 My Goddaughter was recently in a roll over accident after she had a seizure and hit an over pass. Thankfully no one else was hit and the lady that saw the accident said she rolled over 6 times and landed on her roof. The lady was able to unbuckle her and drag her out of the car, she thought she smelled gas and wanted to get her out just incase.  My Goddaughter has many scraps and bruises, but talking to her mom I found out that through test they ran they found other problems they will be dealing with in future appointments, so I got onto making a card with a positive message which she needs at this time.  Having God by our side in our scariest times of uncertainty is what we have to hold onto. She is 31 but never told old for a reminder from her Godmother who is in control and will lead her through this time.

I used watercolor paper to stamp the flowers on and water colored the flowers.


Stampendous - Flower field stamp on watercolor paper w/Daniel smith watercolor paints and Spectrum Aqua marker for yellow flower
Memory Box - Stitched Rectangle layer die
Craftaroo - clear gems
Simon Says stamps - You got this sentiment stamp


I hope you are enjoying a great start to your weekend,
Thanks so much for taking the time to stop by and say Hi,

Connie

Thursday, October 22, 2020

Hold on tight to your Dreams

 I think this sentiment is good for any age but especially at this time for a young adult just starting out, I wanted something fun, and this paper pack gave that to me.  I was given this pack of paper many years ago on a blog win, so it is good to use something that I have had for awhile too!


Graphic 45 - Le Cirque paper pack
Spellbinders - A2 matting basics A
Tim Holtz - small talk sentiment


After some cool rainy days we are having one day with no rain and warm temperatures, so we are headed out to enjoy a walk in one of our parks. 

Continued prayers for those dealing with the fires, we know a couple that are out there and the fire is about 30 miles from their home. 

Thanks so much for taking the time to stop by today,

Connie

Tuesday, October 20, 2020

Sending Bouquet

 I am enjoying these flower dies from Tim Holtz, I love the look of flowers coming out of an envelope so I used my Envelope maker and made the envelope then I inked the inside because it was a little too white when I laid my flowers against it.  I am hoping I didn't go to overboard with the flowers.


some of them were cut using watercolors that I did, some are alcohol inked backgrounds and some are pattern papers.  I thought it needed a little something extra so I little flowers from a die set and cut them and added some stickles to the centers and had them falling onto the sentiment tag.


Bo Bunny - Beautifully Brisk paper
Kreate a pocket - Envelope
Tim Holtz - Wild Flower stems #1
Martha Stewart - Garden Trellis punch
Taylored Expressions - Arbor Accessories die (tiny flowers)
Memory Box - Stitched Rectangle layers die
Gina Marie - Birthday words sentiment stamp
Stickles - Broken China (flower centers)

I am sad to say that of all the pictures I took I never did get a side view to show the dimension of the bouquet, but the card is on it's way to the birthday lady!!

Thanks so much for taking the time to stop by today, hope the start of your week is going well!

Connie

Sunday, October 18, 2020

Old Fashion Birthday

 I had been seeing a few cards lately done with typewriters and that reminded me that I had a stamp and die set that I hadn't used in awhile, I love the way this turned out, I love it for a masculine card!


I printed the typewriter onto some patterned paper to give it more of an antique feel, I cut the card base edge with a border punch, both the top and middle pieces were left overs I had saved from other punches I didn't use on other cards.  I cut a slot into the typewriter stamped piece to put my sentiment down into the typewriter. Inked around the edges.


My favorite things - You're just my type stamp and die set
Distress ink - Old paper
Fiskars - Notebook border punch
DCWV - Travel scrapbook paper
Stampin up - Black Jewels
left over border punches


We have had a very windy day yesterday but warm enough to cook some steaks on the grill, a lot of people were out  in the neighborhood getting things done while it was nice out, oh how I love Autumn!!

Thanks so much for taking the time to stop by today and to say Hi, I love hearing from you,

Connie


Friday, October 16, 2020

Beautiful moments

 I loved that sentiment, Autumn is my favorite time of the year but we all need to take out time each day and collect all the beautiful moments of the day.

We have been away for a few days, we went back to Michigan to see family, it has been a year and it was much needed, we only saw most of our siblings but that was so good to have that time with them.  On the way home we decided to stop by a park in Indiana not to far off of our route but oh my this park was so big that we ended up staying over night to get the full experience.  I will have to say traveling with Covid is not as enjoyable as the past but it is doable.  I am still very far behind on my commenting on your blogs, so I will be playing catch up over the next few days.

I had fun playing with all these dies and coloring them to make a little arrangement! The background was an embossed watercolor piece that I mixed some inks on my mat and dragged the piece through, really liked how it turned out.


Spectrum noir watercolor embossed watercolor papers - To the moon & back, watering down inks for the coloring of the paper
Distress inks - Carved pumpkin, Fired brick and peeled paint
Spellbinders - Decorative Labels 28 die
Tim Holtz - Funky Florals #3 dies and Small talk stickers sentiment


Wishing you a wonderful weekend! 
Thanks so much for taking the time to stop by today,

Connie

Wednesday, October 14, 2020

Autumn colors

 Can you tell I am loving using all the colors of Autumn right now, my favorite time of the year.

Once again using an image from my coloring calendar. The sentiment was from the same paper pack as the background paper, I just cut it out using a tag die. Also leaf and acorn from dies also.


Coloring for calm calendar 2017 - colored w/markers and wink of stella in the center
Spellbinders - Fall Foliage, A2 matting basics A and Back to basics tag dies
DCWV - Wild Splendor paper

You can see a little of the shine the wink of stella glitter gave to the center of the flower.


Hope you are not getting too much Autumn overload because there is more to come :)
Thanks so much for taking the time out of your busy day to stop by and say Hi,

Connie

Monday, October 12, 2020

Autumn Beauties

 I have been sharing a lot of cards using the wren out of this stamp set and I am finally using the robin.  Also using my shiplap die again but this time on just bottom portion of the card. The top portion was made using up ink that was on my mat after doing other backgrounds, instead of wiping it up I ran some water color paper through it, later adding some gold splatters and liked the results. Also adding some Autumn berries to the mix, which I fussy cut.


The Greetery - Robin & Wren, Budding Beauties stamps, Shiplap Builder dies
Background from smooshing water color paper into wet inks
Gold Splatters on background


Thanks so much for stopping by and hope you enjoy a great week!

Connie

Saturday, October 10, 2020

Autumn Birthday

 Using more of the papers I won from the challenge in my group, the happy birthday and sentiment came from a card quote book, I just did some inking on them and added them around the tag from the papers. The leaf was in my stash of one I had made in the past using mega flakes. Thought it made a nice masculine card for a young man, my great nephew!


Cardmakers - Card Quotes
Bo Bunny - Beautiful Brisk papers
Leaf die w/mega flakes
Spellbinders - A2 Distressed Edges


You can see the shine on the leaf in this picture!

Hope you have a great weekend, Thanks for stopping by,

Connie

Thursday, October 8, 2020

Qtip Pointillism

 The challenge this week in my stamp group is to do a technique called Q tip Pointillism.  I had never heard of that before, she gave us instructions and asked us to use inks.  I just had to google it and see what other info is out there and I noticed that most of those do the technique with paint, I was fine using ink, not as much clean up or mess I figured, LOL!

I had intended to use this as a birthday card for my great niece, but after finishing it and then cutting it out,  I thought wow that looks like Christmas not birthday, so I went with a Christmas theme, we were to use at least one stamp on it so I stamped and colored the poinsettia, and die cut the leaves and bow, embossing folder on the background cutting that with a curve border die and a strip piece of poinsettia paper to go with it.


Pointillism background - Qtips pressed into Distress Oxides, cracked pistachio, Lucky clover and Candied Apple inks
Spellbinders - Floral doily motifs and A2 Curved Borders one dies
Stampabilities - F1188, colored w/markers
Cuttlebug - Swiss dots folder
Poppystamps - Lovely gift bow die
Taylored Expressions - Mini Leaves die
My Minds eye - O Christmas tree paper


It is so funny how sometimes cards just lead you in the direction that want to go, not what you are intending but end up working out :)

Thanks so much for taking the time to stop by today and say Hi,

Connie

Wednesday, October 7, 2020

Crafty card

 I had a very busy day yesterday so wasn't able to get around to posting, so I am still sharing another card I did for the World Cardmaking challenge our card making group had.  This challenge was to make a crafting theme card and then send it to one of your crafty friends.

I finally found a crafty stamp and then had to figure out how to use it. I decided on making a crazy quilt design for my background using scraps.  I had plans on using a stamp for faux stitch marks and as you can see I started out doing that around the edges.  I wanted to use a white ink but that wasn't showing up at all so I went with a light brown over it and it was ok but I just didn't think it worked well, so between the actual scrap pieces I poked holes so that I could stitch a zig zag stitch between them and using some of my floss I hand stitched the pieces.  Of course after stamping and cutting the sentiment out with a stitch die I thought it looked a little plain so I added some buttons to it.


Great Impressions - E725 stamp, colored w/markers
Memory Box - Stitched Rectangle layers die
Making memories buttons
Crate Paper - DIY shop paper
Crafters companion - Pretty borders stamp (around edges)
Hand stitching with floss


Thanks so much for taking the time to stop by, I have been very busy as of late so I am a little behind visiting you all but will try to catch up :)

Connie

Monday, October 5, 2020

Warm Wishes

 On Saturday it was World Cardmaking day, and my Card making group had challenges going that we were able to work on through today.  I am hoping to get through a couple more today, we will see.

First up we were to make a card using a cup, it could be coffee, cocoa anything we chose.  I was in the mind set to do Hot Cocoa and make another Christmas card since I am not a coffee drinker and until it was time to stamp a sentiment did I realize oh this is suppose to be a cup of tea, ooopps. Hopefully the receiver still thinks of it as a cup of cocoa even with the tea bag string hanging from the cup, LOL!

My sister had given me a few craft goodies she didn't want anymore and these little candy canes were in the bag, thought it would work as a nice Christmas accent. I cut a doily from my stash in half to put under the cup.


Color for Calm 2017 calendar image- colored w/markers, fussy cut
Elizabeth Craft designs - Cool diamond glitter
My mind's eye - O Christmas tree paper
Simon Says stamp - Tiny word Christmas sentiment stamp
Candy Cane
Doily

The next challenge was to use all white on card.  I was going to punch all kinds of snowflakes out and glue them to my panel, when looking for them I came across this die I had forgot I had and so I cut out 4 of them so I could do some layering.  I also cut the joy out 3 times to give it more lift, not sure why it looks more cloudy looking around the joy.  I also used some new to me accent called Diamond Dust, oh this stuff when you move the card just sparkles, gives a gorgeous touch! Wish it would show up in pictures.


Poppystamps - Dancing snowflake Tile die, cut 2 times for each panel
Spellbinders - Holiday sentiments die - cut 3 times
Floracraft - Diamond Dust


YAH!! more Christmas cards done :)

Thanks for stopping by today,
Hope your week is off to a great start!

Connie

Saturday, October 3, 2020

Linen Technique

 It was my turn this week to host a challenge for my stamp group and I went with the Linen Technique, you can see the tutorial HERE .  I think I had tried this years ago but thought it would be fun to give it another go.

At first I had a too fine piece of sandpaper but when I finally found a rough piece that is when it worked out great!

The first one I tried was using a piece of Close to my heart glossy card stock and my Rusty Hinge Distress ink.


ODBD - Living Water stamp w Memento ink
CTMH - Glossy paper, scratched both ways with rough sandpaper, inked with Rusty Hinge Distress ink
Hot off the press - 63 Thin line border Dazzle stickers
Sticklers - leaf sticker


On my second card I thought I would try my glossy photo paper and see how that worked and I think it worked just as well.  My card making group is also celebrating World Cardmaking day and the challenge is to use at least 3 different pattern papers on one card and so I cut out all my leaves with scraps of pattern paper  I had.


I wrapped the just around the background piece and then tied my stamped sentiment tag to it.  Cut and layered a piece of tulle and music piece for the base to set the leaves on and added some gold gems to it.


Spellbinders - Fall Foliage, Ferns and Back to basics tags dies
Taylored Expressions - Mini leaves die
Photo Paper - Scratched w/rough sandpaper both ways and Bundled Sage Distress Oxide rubbed over background
Black Sparkle tulle
Music paper
Queen & co. - Gold jellies
Jute


Hope you all are enjoying your weekend so far. We had a clean up morning at our church so I am wiped out, I think for as long as I can hang I will do some more challenges that our group is having for this weekend to celebrate card making day :)

Thanks so much for stopping by today,

Take care and stay well,

Connie

Friday, October 2, 2020

Birthday birds

 I thought this cute bird watching over her eggs getting ready to come into the world would be a cute image for a bird loving birthday card.  I went with stamping in muted tones for the bird and eggs, and the rest of the card showing fall colors.


The nest, bird and eggs are all separate stamps and they all have matching dies in this set to cut them out. I gave the birds a bit of speckled dots to match Momma. The inner framing was from the paper pack and I cut the outside frame with a die, adding a few flowers to the corners with some added bling.


Hero Arts - Chrip stamp & dies, colored w/markers
Bobunny - Beautiful Brisk papers
Spellbinders - Candlewick rectangles and Lacey oval dies
Prima flowers
Gems


We are in the thick of fall weather, even below our normal temperatures.  So good to be able to get yard work done when it isn't so hot. Still praying for those out west who have lost their homes and are dealing with all the fire and smoke.

Thanks so much for taking the time to stop by today,

Connie