Wednesday, February 28, 2018

Blossoms

I don't know what it is but I have been loving brown and blue combo lately, using these coloring cards makes it go quickly, great when you want to send a quick thank you to someone.


Hot off the press - Awesome Blossoms for Colorist, colored w/markers
Reminisce - wedded bliss thank you sticker

We found a vehicle yesterday, so glad to have that over with, I think car shopping should be put on the top ten list of most stressful things in life. Thankful we are done and I can get back to normal around here.

Thanks so much for taking the time to stop by,

Connie

Tuesday, February 27, 2018

Party Girls

I was going through the magazines with goodies I had bought at the last yard sale at my stamp store and I came across these cute party girl images, and my great nieces birthday was coming up so I cut one of the images out so I wouldn't forget to use it. I think it is just perfect for her age. I cut the image with a stitched die and layered it onto pink and then found some fun papers that went with it for the base. Added a few sequins and a sentiment and it was done, one of those quick and easy cards.


Making cards - Clipart image and papers
Memory box - Stitched Rectangle layers die
Spellbinders - A2 matting basics A&B dies
Iridescent sequins

Thanks so much for stopping by and hope you have had some time to be creative :)

Connie

Sunday, February 25, 2018

Touch of spring

As many of you may have noticed I tend to go toward earth tones when making some of my cards, but today I went with bright colors.  Spellbinders was having a sale just before Christmas with dies half off so you know I had to take advantage of that, I went with the white base to this, that way when I stenciled through the die you would see the colors better, do you know how hard it was for me to have that much white :)  All of the decorating inside the die came from that same set.


Spellbinders - Labels 50 Decorative Accents die
Raspberry Road Designs - paper
Penny Black - Sprinkles and smiles sentiment stamp
Stickles - flower centers

I am so excited the sun is shining this morning, we have not seen the sun in a few days and it is just wonderful!!

Thanks so much for taking the time to stop by,

Connie

Friday, February 23, 2018

Rustic Nativity

Since I still had all the Christmas stuff out I decided to go for another one, this time with a Nativity stamp.


I wanted to go a little rustic and to keep with the wood theme, I first stamped a wood plank stamp onto kraft cardstock and then cut it down to be an accent piece behind the stamp. I thought the twine would give it a little more rustic feel to so I added that and decided to tie on my tag with it also.  One of those cards that just kept going together.


Northwoods Rubber stamps- Holy Family in Arched Rectangle, colored w/markers
Fun Stampers Journey - Board wall stamp onto kraft cardstock
Spellbinders - Back to basics tag die
Taylored Expressions - Poinsettia Bouquet (sentiment stamp)
Twine

Thanks for taking the time to stop by today, Hope you have a wonderful weekend, we are suppose to see a bit of sunshine on Sunday so I look forward to that :)

Connie

Wednesday, February 21, 2018

Christmas with wood

Our Christmas challenge this month in my stamp group is to do use wood.  Well since I had 3 extra wood grain backgrounds from our last challenge that is where I started.  This wreath stamp is an all over red stamp, so I was trying to figure out what I would do with it.  I could have embossed all in one color but I wanted it to be colorful against the background. I first tried to stamp with a light ink and I started coloring the bow, then went onto the ornaments, that was all looking good but then when it came to the pine cones it started looking sad, so that went into the trash and I started again this time with watercolor paper and colored the whole stamp with my Spectrum Aqua markers, when all done coloring the stamp I spritzed it with water and stamped down onto the watercolor paper and let it sit there for a few minutes.  When I lifted it up this was my results, I thought it was pretty cool.  I added some Spectrum clear sparkle pen to the ornaments and it was done.  I hand cut it, the outside with my scissor and the inside with a Fiskars craft knife.

If you missed how to do the background you can find it HERE .


Inkadinkado - Folk Wreath, direct to stamp coloring w/Spectrum Aqua markers onto watercolor paper
Wood Grain background on glossy paper using My favorite things Kraft and Stampin up Chocolate chip inks
DieVersions - Season's Greetings die

I have only managed one Christmas card this month but I guess the month isn't over, hopefully I am not losing speed on getting them done early.

Thanks so much for taking the time to stop by today and all your kind words about the accident, we are heading to the shop today and see if they feel it is fixable.

Connie

Tuesday, February 20, 2018

Tattered Florals

I save my double sided papers for just these kind of cards, I love this look.  I cut through the center of the paper and adhered the sides down with scor tape so that it would stay put.


The flower was die cut a couple times with each size and I did a little shaping of the flowers, the button was sewn through all the layers. A few gems to top it off.

K&co. - Classic K paper
Sizzix -Tim Holtz -  Tattered florals die
Button
Spellbinders - Special Birthday sentiments
Recollections - Iridescent gems

Personal note here.  My hubby and I went to Mississippi this past weekend, since my hubby had 4 days off and it was a 10 hour drive and we hadn't been to the gulf coast there we thought it would be fun to explore a new place. We were only 6 miles from our hotel when we were side swiped by a Semi.  It tore the whole drivers side of the car up and we can't even get the back door to open, the drivers side is bent but it at least opens and shuts well enough to lock. But most of all we are so thankful that no one was injured in this accident.  It shook us up quite a bit, by the next morning we decided to stay with our plans for the trip instead of heading back home, and I think we made the right choice.  We are safely back home, now time to deal with the insurance and find out if they will replace the doors or say it is not worth repairing and we will have to get a new car.

I hope you are all well and having a lovely start to your week, we have come home to much rain but we are in need of it here so that is all good too :)

Thanks for taking the time to stop by and say Hi,
Hugs,
Connie

Monday, February 19, 2018

You are a Star

Card for another great nephew, hopefully this is a good preteen card.


Studio G -  Stamp
My mind's eye- Boy Crazy paper
Spellbinders - Square and Square swatch dies
Die Versions - Stitched  nesting stars

Hope your week is off to a great start!
Thanks for coming by today,

Connie

Saturday, February 17, 2018

Flowers

More Daily Calendar images, colored with markers.


Basic Grey - Lily Kate paper
Daily coloring calendar image, colored w/markers and fussy cut
Martha Stewart - Garden Trellis border punch
Penny Black - Sprinkles and Smiles sentiment stamp


Daily coloring calendar image, colored w/markers, fussy cut
Ms. Sparkle & co. - Watercolor paper pad
Anna Griffin - Fretwork die
Recollections - Vintage gold glass glitter (flower center)

Thanks for taking the time to stop by today, hope you have a wonderful weekend!!

Connie

Thursday, February 15, 2018

Fox and Pyramid State Recreation Area

No the fox wasn't in the park it is the card I am sharing today. My friend loves foxes so I made this for her birthday, now if you know me well enough you would never imagine me putting this kind of sentiment on a card but I knew she would get a kick out of it and she did.
This is another image from my daily coloring calendar of last year.


Calendar image - colored w/markers
Sassafras - mix and mend papers
Paper smooches - Happy Birthday sentiment stamp set
Liquid Pearls- Chestnut on sentiment banner

It has been almost a month since hubby and I went to Pyramid State Recreation Area, so I thought I had better share more of winter time here before it is spring, LOL! This park is huge and we didn't get to see it all when we went so we will be back for sure in the spring.  I can't tell you how many lakes there are but they are all over. Many hiking trails, we only manage to go down one of them.


We started watching the sunset glowing on the trees across this lake but then decided since it was down in a valley to drive and see if we could get to a higher ground to view the sunset and when we came over this ridge and seen this we stopped the car and jumped out and started taking pictures.


I will have to say of all the sunsets I have seen this one was just outstanding, it was so moving. Every minute as the clouds would move it changed.


The textures and colors were just amazing.


I got a few pictures of my hubby taking pictures and then viewing them on his camera but this one I liked the best.  I am using the first camera he started out with and he has upgraded quite a bit.

Thanks for taking the time to stop by today,

Connie

Wednesday, February 14, 2018

Happy Valentine's Day

I can now share that challenge from my stamping group, I used it for my hubby's Valentines card.
It is a Twist pop up card. Here is the Link if you would like to give it a try yourself. This was fun and fairly easy to do, the only thing I would say is if your cardstock that you are using for the twist part is fairly thick, make sure that you have it down from the fold of your card, I think I applied mine right to the fold instead of just below and by the time I held it closed then tried to open it to make sure it worked it wasn't able to move it, it still works for me but until I did a little more burnishing it was kind of hard to get the card totally closed but it works now.


It's hard to tell but on the very bottom heart I stamped Be Mine.

Here is the inside.


Hubby loves the great outdoors so I know he will love the pop up images. 
I wrote the message below, after taking pictures :)


Our Daily Bread design- Vintage Ephermas collection paper (front base)
DCWV - Once upon a time paper for hearts
Tim Holtz - Vintage shabby paper inside panels
Art-C - Cardstock (stamped image on the inside)
Spellbinders - Lace Hearts and Classic Hearts dies
Stamps of life - Minis 4 circles (be mine stamp)
Crafter's Companion - Silhouette Grass stamp cut for the panels
Memory Box - bird dies
Fiskars - corner punches


Sending happy wishes to all my blog friends today!!
Thanks for stopping by,

Hugs,
Connie

Tuesday, February 13, 2018

Deep Sympathy

It is hard to make sympathy cards but when they are for a young person it is even that much harder. A long time, on line friend lost her 32 year old daughter in a car crash. I can't even imagine what she is going through right now.


I stamped and used white embossing powder around the edges of the patterned paper and added some washi tape to some white cardstock before punching out the butterflies and added some small clear gems to them.

Papertrey ink - Meadow Greens w/white embossing powder
Taylored Expressions - Care & Comfort II stamp sentiment
Tim Holtz - Symphonie Tissue tape
Martha Stewart - Butterfly punch
Studio G - gems

Thanks for taking the time to stop by,

Connie

Monday, February 12, 2018

Create Art

I was able to finish my challenge last night, I had started the background on Thursday so that it had time to dry by the time I could get back to it.  The challenge one of the ladies had for us was to create a piece of art for ourselves that would give us inspiration and we were not to use any sentiments or printed papers.  Then frame it and share were you have it in your home.

Well the first thing that came to mind is sunshine, oh how that makes me happy, flowers was next, I love looking at them and smelling them, and there is nothing better than waking up to the birds singing in the morning, so that is where I started with my Rays of sunshine stencil that I used modeling paste and added some gold glimmer mist to it and put through my stencil, when I was done I also sprayed more of the glimmer mist onto the background.  Yesterday is when I added the layered stamped flowers and the bird which I also cut from a piece of watercolor paper and used my Spectrum Aqua markers, except for his belly, I accidentally used a alcohol pen.


My friend had gifted me the frame to put pictures from our travels for my Christmas present this year and since I hadn't used it yet for that I used it for my art piece.  I used pop dots to pop up some of the flowers and the bird.

I decided to put my frame on the same table that I have a picture I just love of my daughter and hubby, their birthday's are 2 days apart and ever since she has gotten older we celebrate them together. My Mother and Father when they were first married, it is where I start my day with reading my bible and praying, and so it gives me inspiration, even if it isn't sunny outside that my heart can still be sunny inside, and how thankful I am for these things that God Blesses my day with. My hubby gifted me with the flowers for an early Valentine gift, they are not normally there.


Have you made a project for yourself lately, maybe it is time to make something to inspire you :)
Have a wonderful week and thanks so much for stopping by,

Connie

Sunday, February 11, 2018

Sending Sunshine

I have been gone Friday night and all day Saturday at an If: Gathering . Our Church hosted it once again for this area, they had it in Austin and simulcast it all over the world so everyone can participate at the same time.  We had over 80 women at our church. So I haven't had the chance to get anything done for my challenges but I will be working on that this afternoon :) Instead I have a card I made for my hubby's niece that so hates winter and would love to live somewhere warm all year around :)  I colored it with pencils this time.


Inky Antics - Butterflies and Gardens stamp set colored w/pencils
Spellbinders - Marvelous Squares and Grommet tags dies
Brads

We woke up to a sheet of ice out there, since they treated the roads the news was saying there are slick spots but all sidewalks ect. were very icy and there had been a few accidents so they made the call not to have church today so no one would slip and fall.  It seems to be melting now so that is nice, don't like that ice stuff.

Hope you have a blessed Sunday,
Thanks so much for stopping by,

Connie


Friday, February 9, 2018

God Bless you

I can't share what challenge I did next because it is for my hubby and he follows my blog, so I will be sharing that next week, so today I will share a card for a friend.  I already shared one card from this set of frames and I just had to do another, I believe there were 4 different sets of frames in the package, 2 of each.


K&co. - Floral Acetate Frames and Floral Icons
Our Daily Bread designs - Shabby Rose papers
Gina Marie - Birthday words stamp

I wish you a very fun and creative weekend ahead!

Thanks so much for taking the time to stop by and say Hi,

Connie

Thursday, February 8, 2018

1 Stamp 3 ways

The next challenge in our group was to use one stamp but use it in three different cards and different ways. We were to use only one other stamp with it.  My first was as a background, while highlighting the center one by coloring it.  I embossed them all in silver embossing powder.


Darcie's - Garden Bird, embossed w/silver embossing powder, center one colored with marker
Lace
Ribbon
Doodling

The second card I used the bird as my focal, now this card I did mess up the challenge because I used 3 stamps because the sentiment isn't part of the framing that is a separate stamp, didn't even think about it until I was taking the picture, oops.


Darcie's - Garden bird stamp set (frame, sentiment and bird)
Lace
Martha Stewart - Flower punch
Stickles

Now this last card took a lot of thinking to figure out how I could use the bird differently, and I came up with a flower.  Stamped the bird many times, I have left overs now for other cards :)  And played with them for awhile and came up with cutting the birds beak, legs and tail off, and  then putting a whole through it's eye to thread the brad through and that way they would all be the same length around.


Darcie's - Garden Bird (cut 6 times for flower)
Stampin up- Stem stamp
David Tutera- Birthday sentiment sticker
Basic Grey - Brad
Sequins

Thanks so much for taking the time to stop by today, love hearing from you,

Connie

Wednesday, February 7, 2018

Wooden Background

The next challenge our group had was to make a wooden background using the technique found Here in this video.  I totally didn't get the results as in the video but I think all my brown tone ink pads could have been juicier, that may have helped, or it may have just been the operator, LOL!

Fun technique if you want to give it a try.  Here are my 4 tries, the top two or with Distress inks and oxides, the bottom two are with Dye inks.  The one I chose for my card was the die ink. You use glossy cardstock for this technique, I think that is why I have a bit of shine in this picture.


Memento - Desert Sand and Rich Cocoa inks for background
Our Daily bread designs - Nest stamp (fussy cut, colored w/markers)
Crafty Secrets - Bird Notes stamp (bird, fussy cut, colored w/markers)
Technique Tuesday - Happy Birthday sentiment stamp

Thanks for taking the time to stop by today,

Connie

Tuesday, February 6, 2018

Sketch challenge

In this challenge we needed to use the sketch provided and add either a valentine, flower or sparkle. I added Valentine and sparkle that was already on these die cuts that I won off of Birgit's blog last year.
I added my own sentiments to the plain hearts.


Valentine & heart images won from a blog
Basic Grey - Sugar Rush papers
Martha Stewart - Border punch
Our daily bread designs - mini tag sentiments stamp

I was honored to have a couple of my cards in the best of 2017 at Splitcoaststampers if you would like to see some great cards all in one place click on the Tab on the top right of my page.

Thanks so much for taking the time to stop by,

Connie

Monday, February 5, 2018

Color Explosion

My Stamping group is having our winter week of challenges, and today I am sharing with you the challenge I had for the group to try.  I came across This Video on a color Explosion technique and I totally loved her results.  Now I don't have the powdered pigments that she was showing so I first tried this technique with my Pearl Ex pigment powders and I didn't care for the results at all.  It could be the colors I have and she shows in the video to add the embossing powder over it and you just drying it with your heat gun and it looks fabulous, well mine just came right off, so not sure what embossing powder she used but mine didn't do that.

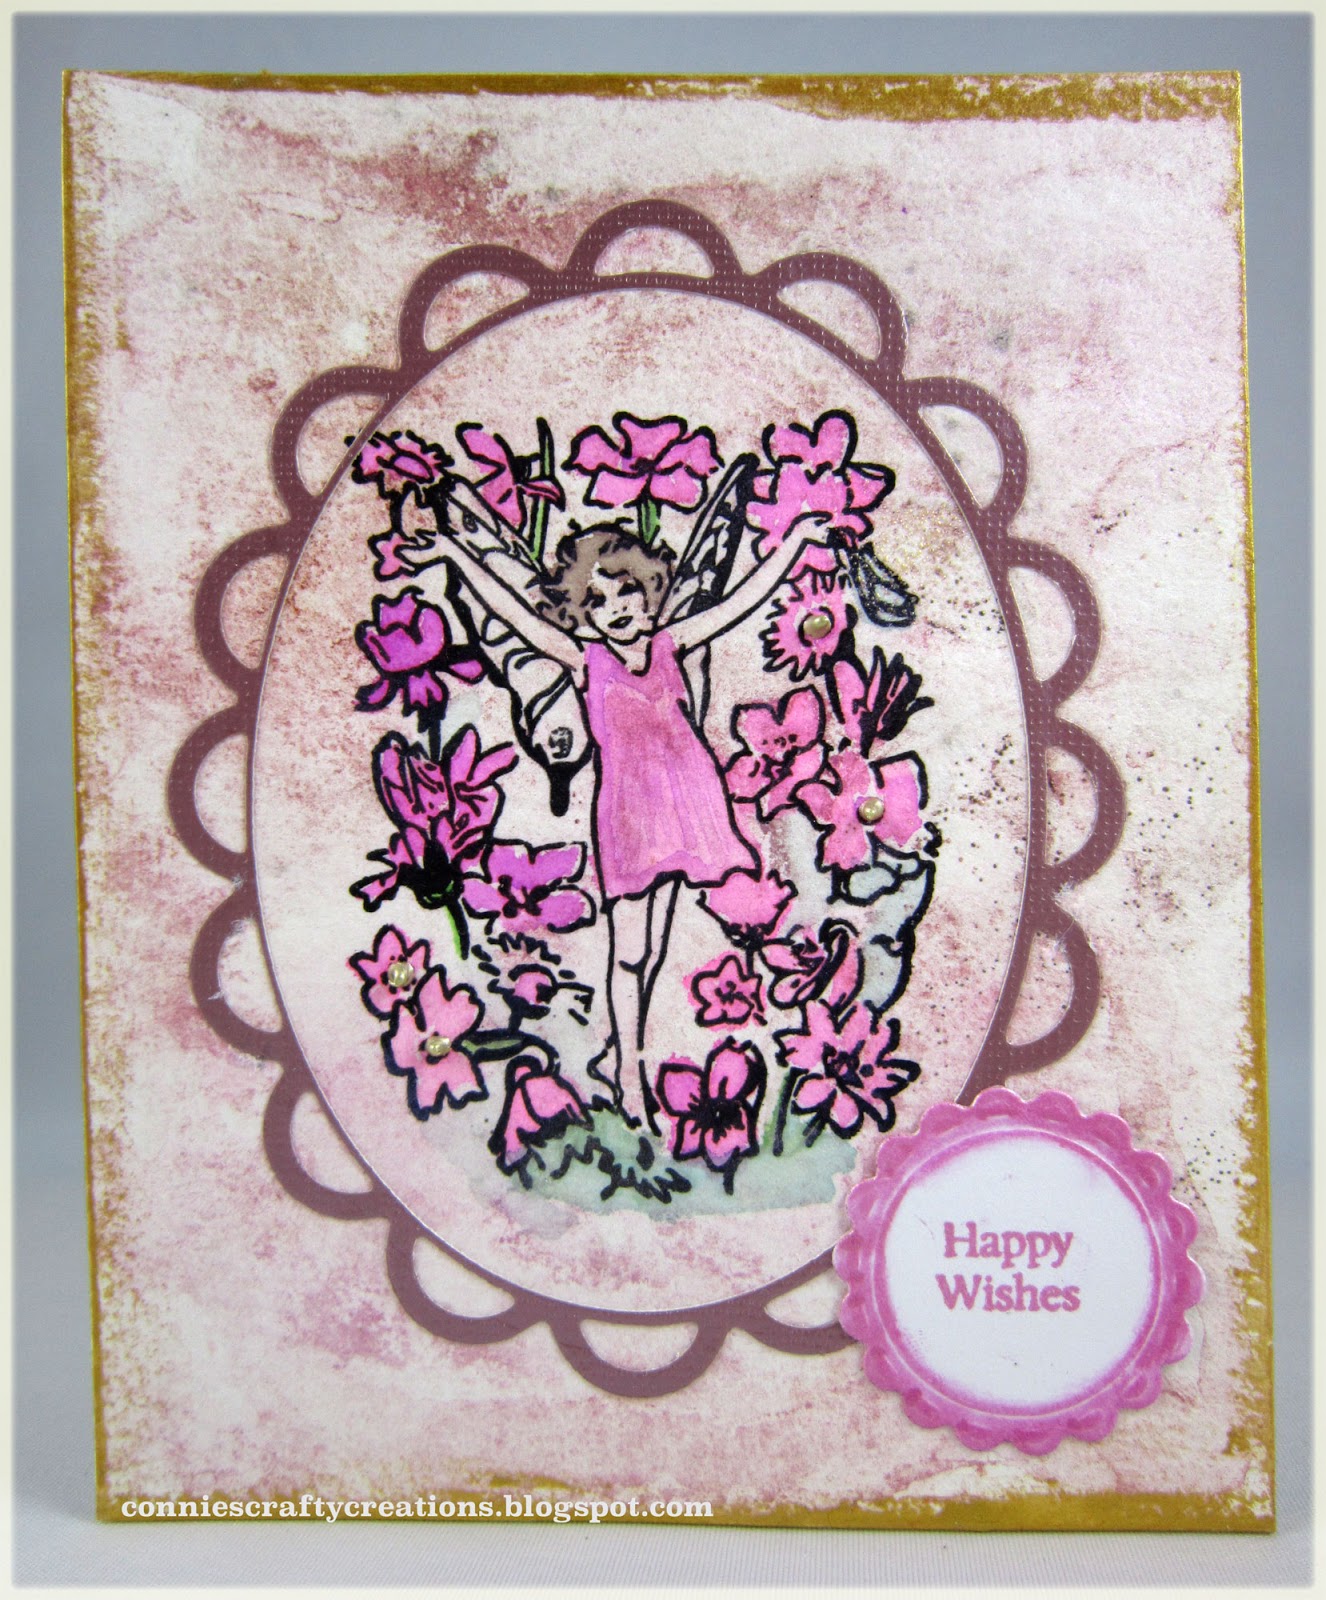
Here is the result from my first try.

With this technique I added the powders and then sprayed with the water.

Pearl Ex Powdered pigments - Duo Red Blue, Interference Violet, Interference gold, sunset gold
Embossing powders - Enchanted gold and Gold Tinsel
Stamp from Magazine, colored w/ Spectrum Aqua markers, clear glitter pen on wings
Spellbinders - Classic oval, lacey oval and lacey circles dies
Nuvo mousse - Indian gold on edges
Nuvo crystal drops - Pale gold in flower centers
Our daily bread designs- mini tag sentiment

The next one I decided to try colorbursts, after spraying my watercolor paper with water then adding the embossing powders and drying and the embossing didn't stick here either, so I watered down my Nuvo mousse and took a paint brush and splattered with the gold.


I do love the results I got on this one but still the technique I was looking for was still not achieved.  I think that shows that all products are not the same, or this girl just didn't do it correctly :)  Let me know if you give it a try.  I am curious what the others in the group come up with too.

Colorburst - Marigold, Naples Yellow and Peony
Embossing powders - Enchanted gold and Opaque sparkle
Nuvo Mousse- Indian gold (splattered on background)
Memory Box - Sylvan Corner die
DCWV - Foiled Cardstock
Spellbinders - Special Birthday sentiments embossed in Gold

Thanks so much for stopping by and I hope you have a fabulous week!!

Connie

Saturday, February 3, 2018

You're Sweet

Connie from Crafty Home Cottage blog emailed me a last year and asked if I would be interested in some stamps she didn't want anymore.  Oh boy I said sure I would be interested and I was so excited to receive a box of wood mounted stamps in the mail.  You know a Thank you card was needed for such generosity and I decided to use some of the stamps she sent my way on that card.  You need to stop by her blog, she does posts on gardening, crafting, sewing, quilting and great ideas for the home.  This woman is so creative you will be glad you stopped by.  Thank you again Connie for all the fun stamps to play with :)


The main image and the heart border are both stamps she sent my way, they have been colored w/markers, the buttons are cut from a die.

Hero Arts - Pocket of hearts and Heart Patch border stamps, colored w/markers
Quick cards - Raspberry Road designs paper
Martha Stewart - Embroidered Floral border and tag punches
Impression Obsession - Button die

Thanks for stopping by and have a fantastic weekend!

Connie

Thursday, February 1, 2018

Snow Challenge

Sisterhood of Crafters blog had a Snow Challenge and since I ended up buying another daily coloring calendar at 60% off and the first few weeks of January has been snowmen images so I just had to try one of them out.  I colored w/markers used my stick glue to add to a piece of cardstock and then cut it out with the die.


Added the joy sentiment because they look like they are pretty happy with the snow falling all around them :)

Cheerful Journey Daily coloring Calendar Image - colored w/markers
Lilybee designs - Jingle paper
Lawn Fawn - Fancy Scalloped Rectangle Stackables
Martha Stewart - Snowflake border and tag punches
Taylored Expressions - Poinsettia stamp set w/sentiment
Brad
Wink of Stella white glitter pen for pom poms

We had a few more snowflakes today but nothing that really stayed. Hope you are enjoying the weather wherever you are :)

Thanks so much for taking the time to stop by and say Hi,

Connie