Wednesday, August 30, 2017

Happy Birthday

I bought this die back when I was on the design team for Dies R us and I am just now using it, sad to say I have a few more to go too.

I cut the sentiment circle die 3 times to give it dimension!


I just the left over little flowers from the border punch to decorate the background and added enamel dots to the centers.

Yvonne Creations -- Happy Birthday die cut 3 times and layered
Lilybee design - Head over heels paper
Spellbinders -- Big Scalloped Circle lg die
Fiskars -- Border punch (flowers from border punch)
Enamel Accents -- white (center of little flowers)
Starform -- Transparent glitter gold stickers (on sentiment)

Thanks for getting stopping by today and letting me know you have!

Connie

Monday, August 28, 2017

Sun Challenge

In my cardmaking group after the eclipse they had a challenge to use a sun on a card, and I just so happened to have made this card for one of the ladies in my stamping group who gifted me this bird stamp and sun stencil, I wanted to send her a thank you.

I made the background using my inks, the clouds were done using my homemade cloud stencil and I stamped the bird twice, once on the background and then onto another white cardstock so that I could color him in but not have to mess with cutting out his fluff on top of his head or his legs, just the body, made it a lot easier :)  Added the die cut tree, bird and leaves and it was finished.


Joggles -- Sunshine stencil and Loretta stamp, colored w/.markers
Distress inks for background - Scattered straw, carved pumpkin, tumbled glass and mermaid lagoon
Memory Box -- Bare Sapling and bird die
Dee's Distinctively - Tree Toppers die

Summer is coming to a quick close, soon it will be time to be making all the fun fall cards :)

Hope you are having a perfect start of this new week, my thoughts and prayers go out to all of those effected by this terrible hurricane.

Connie

Saturday, August 26, 2017

Tag w/flowers

I just love this paper stack and the tags that you could buy separately to go with them. I tend to not use the papers I like the most but that is just crazy, I need to get these beauties out and use them :)


To dress up the tag I added the flowers which I shaped using my stylus and foam mat, along with some Nuvo drops for the centers. a button with some jute and the tag was done, I wanted to tie in the lace that was printed on the tag so I added a bit of lace to the card. It is sometimes nice to have the papers do most of the work for you all you have to do is add some embellishments.

K&co - Classic K paper and tag
Recollections -- lace on a roll
Martha stewart - Flower punches, shaped w/stylus and mat
American crafts - Jute
Button
Nuvo Crystal drops -- Pale gold

I hope you have a wonderful weekend as we are getting ready to close out the summer!!

Thanks so much for taking the time out to stop by today!!

Connie

Thursday, August 24, 2017

Sparkle Butterflies

When I saw this package of unused butterfly Dazzle stickers at the yard sale at my LSS I had to get them, they weren't much cheaper than what you can buy them at the store but I haven't seen them in any stores and I didn't have to pay shipping to buy them on line so it was a win win :)

I decided to place mine on a piece of patterned paper that I thought would make a pretty center and fussy cut around the sticker, I only placed the glue dots behind the center of the butterfly so the wings could still have dimension.


I really like how feminine this turned out, as you can see there are all sizes of butterflies in this set. I tied a separate bow and attached it to the card by sewing it on with the jute.

Hot off the press -- Butterfly Dazzles, backed with patterned paper and fussy cut
Teresa Collins - He said she said paper
Spellbinders -- Back to basics tag die
Hot off the press - Tiny words and Phrases Dazzles sentiment
Dashes, Dots and Checks - ribbon
Button
Jute

I didn't mention in my last post but I had my phone in my pocket to take cell phone shots of the day of the eclipse also, well since I didn't want to use the port potty again at the Fort I decided to just wait until we got home to go to the bathroom, upon finishing, my phone popped out of my pocket and into the toilet, thank goodness it was after I had flushed but the water came back in and flooded it and I didn't know that you were suppose to shut it off immediately, well let's just say I fried my phone.  We put it in Rice and the whole bit and nope nothing there.  I was really surprised how many times in that day that I was without my phone how many times I went to use it for things.  Needless to say, hubby didn't like that he couldn't text me from work whenever he wanted to so we went in yesterday and bought me another one.  How many of you are attached to your phones?

Thanks so much for taking the time to stop by today!

Connie

Tuesday, August 22, 2017

Eclipse 2017

Wow is all I can say, this is my first time seeing a total Eclipse and I will have to say it was quite an amazing experience.  I heard talk that before hand that it can be quite emotional and I didn't quite understand what they meant by that, but after seeing it, I understand.  It is an experience like no other. Yes I will admit tears did come to my eyes, God is just Awesome in all his creation!!

Since we didn't have any filters for our camera's to catch the whole eclipse the only pictures I could take was while we were in Total Eclipse, so I will also share the day :)

By the time we got there, which was really surprising to use it only took about 15 minutes longer than it should, we both had to use the Toilet, so off we went searching, now can I just say that it was HOT!!! 80's when we got there but the humidity was so thick that it was like soup out there. It reached into the 90's. We were drenched by the time we found them.  We headed back to our car to get our chairs, camera, cooler to have lunch before the eclipse. We headed for any tree that had shade, well everyone had already taken all the mowed areas so we were in the almost knee high grass, but I didn't care as long as we were in shade.

Look what I saw fluttering around.


Here he opened his wings wide for me


We were very nervous because there were some clouds that started rolling in after the eclipse had started, I took this picture as you could see the rays peeking out from around the clouds going over head.


The biggest group of people were to our left, were the pavilions are and the outhouses.


To our right


In front of us


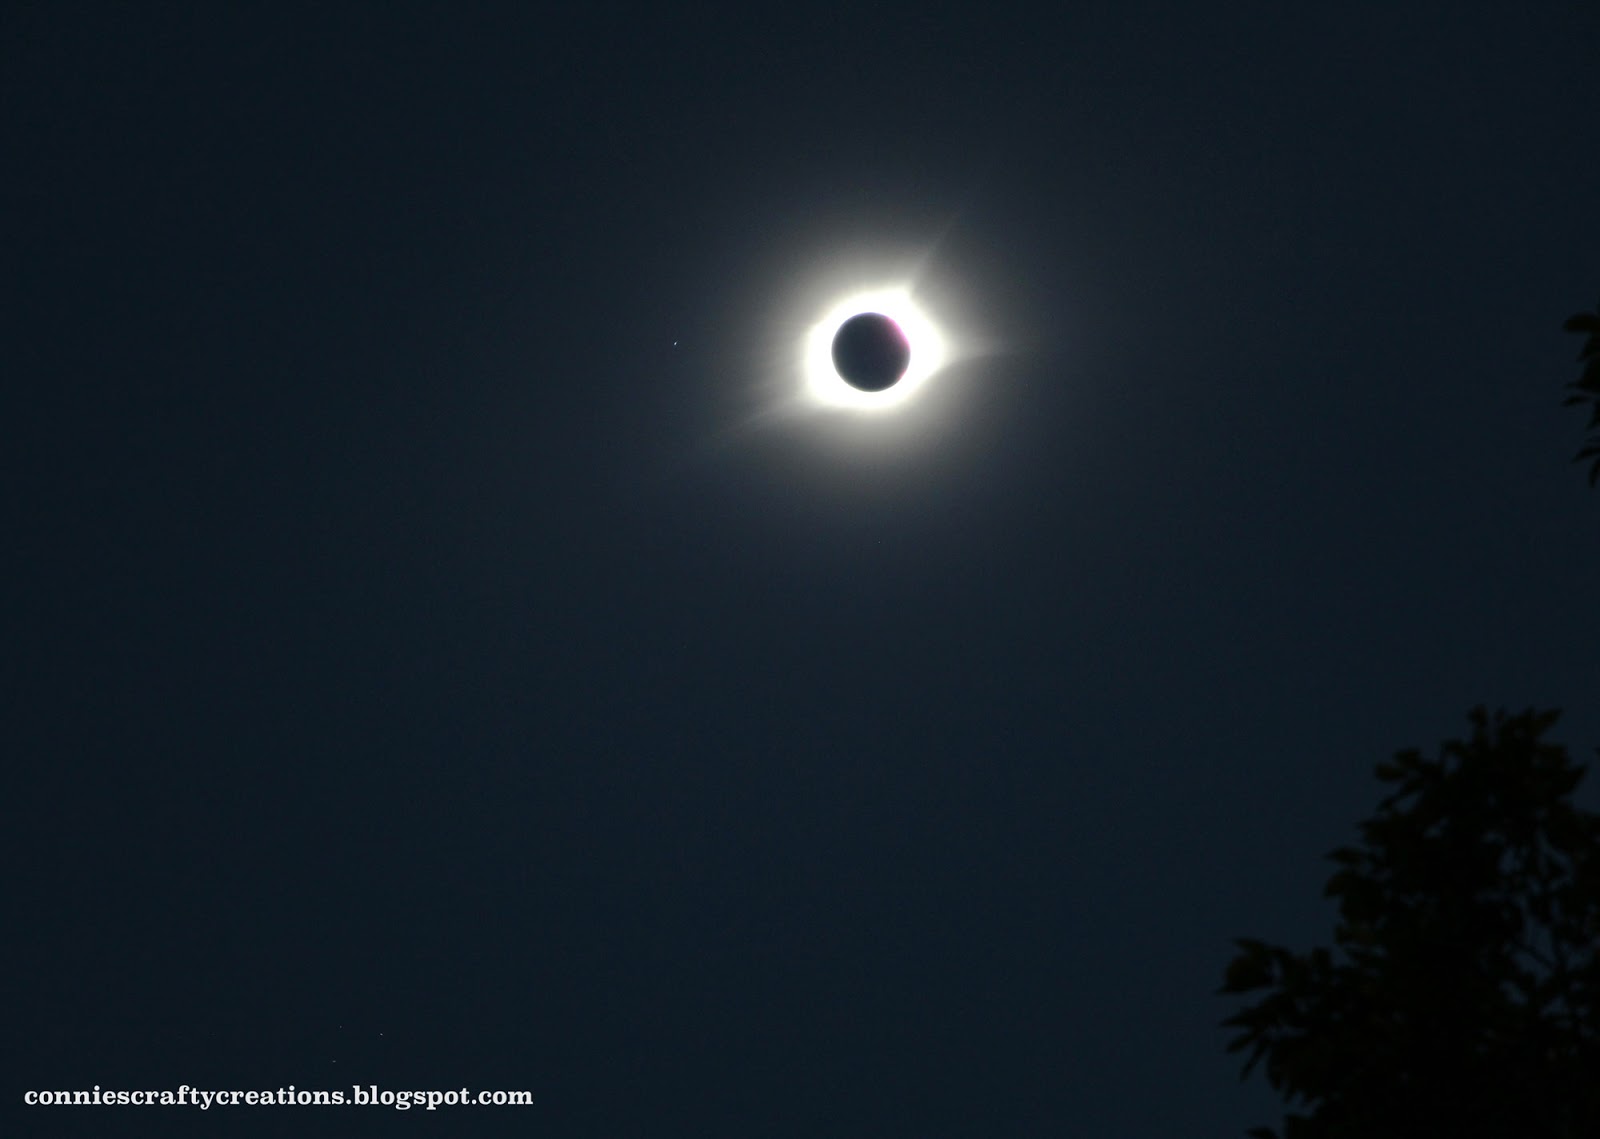
Now for the total eclipse, of course my camera just can't do it justice but this is what I got, do you see that bright spot to the left of the sun, that is Regulus I believe they said, my camera didn't capture any of the stars.


I won't bore you with anymore shots but this one was my last shot, my hubby yelled at me to quit taking pictures after this one since the sun was starting to peek out again and I could ruin my camera, but it is cool seeing the sun come out again. We were in totality 2 minutes and 37 seconds but the time just went by so quickly to see everything and capture it all.


We were glad we went to Fort De Chartres to view the eclipse, there were people all around and I didn't take their picture but we had an older couple that shared the shade of the tree with us that were from Wisconsin, so we shared the experience with everyone, so neat to hear the oohhhs and awwws of everyone around and all the excitement leading up to it, but it wasn't so over crowded as other spots were.  This was our first time there but we will be going back on a cooler day to view the whole Fort area.

Because of the clouds all around us there was a lovely sunset going on also but I didn't get my settings correct to get a good picture because I had my camera set to take a picture of the eclipse.  The evening songs of the birds came out just before the total eclipse and the bugs became a bit louder.  We also saw waves of light on our chairs, as my husband describes it looked like light glistening on water. Just amazing.  We are already looking forward to our next eclipse in 2024 we will once again be very close to total eclipse so we will be doing that again. It's in April, looking forward to it be a little cooler than yesterday was :)

Thanks so much for stopping by today,

Connie

Sunday, August 20, 2017

Hydrangea

I love these collage stamps, I hope this wasn't too dark of colors to use for a summer birthday.


Hampton Art - Hydrangea Collage stamp, colored w/markers
Spellbinders -- Captivating Squares die
Martha Stewart -- Border punch
Recollection -- Pearls
Wink of stella- clear glitter pen

Thanks so much for stopping by,

Connie

Friday, August 18, 2017

Transparency Flower

I have been seeing all kinds of window cards around lately and so I decided it was time to do one myself, I decided to go with a flower with it and then at the last minute I thought I should do a vellum or acetate flower, well since I couldn't find that I went with the transparency, coloring on the transparency is a little rough going, I had to throw away the first but decided to go with my second try, figuring I probably wouldn't get much better :)  I used Stazon ink to stamp both the flower and the leaves and then cut them with my scissor.


Stampendous - Zinnia and Bouquet for you (leaves) stamped on Transparency colored w/markers
Spellbinders-- Labels one and A2 matting basics A dies
Paper Smooches -- Happy Birthday sentiment stamp set
Nuvo Crystal drops -- Pale Gold
Stickles flower center

I added a bit of stickles to the back side of the flower center, I think you can better see it on the card below, once dry I added Glue dots brand pop up clear dots to the back center to attach it to the card, on the leaves I ran them through my Xyron sticker maker and that hides the adhesive on those.

To cut the center window, I first cut my white panel with the die, I then centered it on my card front and then cut that layer with the next smaller size die in the set.


Are you like me and there is a whole list of cards or whatever your craft or hobby may be you want to make or do, and being in two different groups I find myself with not enough time to try all the challenges either, oh my and we are half way through this month.

To answer a few questions from my last post, yes we did finally find the glasses we need to view the eclipse, can't believe how many places were sold out. My hubby did not buy the special lens to take pictures of the sun directly but he does hope to get some landscape type pictures, it depends if we make it to the location he was hoping for, we are hearing that the traffic is going to be just terrible that day with so many people coming to this area to view it.

Thanks so much for taking the time to stop by today, I sure do appreciate when you let me know you have stopped by,

Connie

Wednesday, August 16, 2017

2 for 2

Recently in my card making group they were discussing getting rid of punches because they just don't use them anymore, OH MY!! I still use my punches and actually really love a few of them still, I had made this card just before they were talking about it and thought I just made a card using two punches and two dies.  Is there something from your old tools or supplies that you just don't use anymore and want to get rid of them.


Tim Holtz-- Vintage shabby paper
K&co. -- Blue Awning paper
Martha Stewart -- Border punches
Spellbinders -- Majestic Labels one
Inkadinkado -- Garden Greetings

We are getting just enough rain so that I don't have to water my peppers, that sure has been nice, but I hope it gets it all out of it's system before the Eclipse, I am hoping for a nice clear day, we are right in it's path so we are going to see total eclipse, so excited!

Thanks so much for taking out the time to stop by today,

Connie

Monday, August 14, 2017

Missed Birthday

I have been known to be a little late getting a card out on time, so thank goodness for belated birthday stamp sentiments :)

I used very lightweight handmade papers on these die cuts to give it a softened look, it made gluing down the branch a bit hard but like the softness it gave to it.  Had to add a bit of bling to the flowers.


Spellbinders-- A2matting basics A die
Memory Box--  Magnificent Mum Floral blooms and Botanical Stems dies
Colorbok - Homespun collection paper
handmade papers for diecuts
Gina Marie Stamps- Birthday words sentiment stamp set
Queen & co. -- Iridescent gems

Wishing you all a lovely week ahead!  Thanks so much for taking the time to stop by today,

Connie

Saturday, August 12, 2017

Bird Frame

More goodies from the yard sale at the stamp store, I bought a package of embossing folders that were all frames.


I sanded down the cardstock after embossing to bring it out a bit more.  I used the same pattern paper for both the sentiment and the punched flowers that I shaped with my stylus and a foam mat. Stickles to the center of the flowers and some wink of stella clear to the dots and birds eye along the frame.  Added a row of bling and it was done :)

I am linking with the CropStop Blog HERE .

Darcie -- Bird in Border embossing folder
Tim Holtz -- Distress collection core'dinations cardstock
Spellbinders -- Sentiments one die set
Darcie -- Bling on a roll, added w/scor pal tape
Cloud 9 designs - Christy & friends paper, flower and sentiment
EK Success -- Flowers punch
Stickles - worn lipstick, center of flowers
Wink of Stella- added to dots on embossing and bird's eye

Hope your weekend is off to a good start and hope all those affected by the smoke and fires are getting some relief.

Thanks so much for taking the time to stop by and letting me know you have,

Connie

Thursday, August 10, 2017

Puff flower

I found these flowers that have a bit of stuffing  in them and the button already on it a few years back and I think I bought like 4 packs of them and I really need to use them up so that is what started this card, then I wanted to make a card using an angle die but I don't have them and since I am trying not to buy so much anymore and just use what I have I thought I would try to make an angle using my straight border dies, and I think it worked pretty good :)


This sentiment came with the the little flower so I decided to pick up the colors in the polka dot paper I used for the sentiment and color it in red.  This is another one of those cards I was really pleased with at the end, love it when that happens :) My great niece just turned 22 and her Mom tells me she liked it :)

Crate Paper -- DIY shop paper
Poppystamps -- eyelet stitches die
Inkadinkado -- Garden Greetings stamp set
Ki -- puffies (flower)

Thanks so much for taking the time to stop by today, I appreciate you letting me know you did also,

Connie


Tuesday, August 8, 2017

Waterfall card

I have seen these but this was another technique that I just hadn't got around to trying, so when we were challenged to do it in my stamp group I was excited to give it a try.  I think the hardest part for me was finding stamps that would be the correct size to use, I ended up just using bits of these stamps to make it work. HERE is the video I used to for dimensions. Once again I stamped my images onto patterned paper, I am determined to get my papers used :)


Inkadinkado -- Utopiary stamp set
Stamps of Life -- Standup 4 sentiments
Crate Paper -- DIY shop paper
Spellbinders -- Square die
Fiskars - square punch
EK Success - Circle punch
Ribbon

My friend opened it in front of me so I was able to let her know to pull down on the ribbon, but you may want to put a note inside your envelope if you were sending it through the mail. Or you can stamp or write pull at the bottom, but I liked the look of the ribbon :)

Thanks so much again for taking the time to stop by,

Connie

Sunday, August 6, 2017

All aboard

Masculine card today. I embossed the train with silver embossing powder onto black patterned paper.
Then layered onto silver cardstock. The gears I took some ink to them to give them a bit of a used look to them.


Sorry about the shadow on the right side, I believe that was probably my head, This was the best picture without the bad glare and I have already sent it out so no taking anymore pictures.

Technique Tuesday -- All aboard stamp set w/silver embossing powder
Spellbinders -- Fleur De Lis Rectangles and A2 matting basics A dies
Memory Box-- Mini gears dies
My favorite things -- Label maker sentiments stamp set w/silver ink onto black paper

I thought I would also show some of the goodies from the garden we picked these over a week ago and I have just gone out today and picked another bowl full of the peppers.


The carrots didn't do so well so we didn't do a second planting of them.  I was shocked when I turned around and my hubby had picked them all.  We are thinking that they are not the best to plant inside these patio planters.


The green tops look really good but the product underneath, not so much.  You can see my newly painted deck  a little bit.  I still need to paint the rails, which I may be able to get done soon cause the temperatures are a little better this week :)  We have been able to have the doors and windows open all day today, I am just loving it!! Hope all you that are suffering from the heat out west can get some relief soon like we have.

Thanks for stopping by today!! Hope you are enjoying your weekend,

Connie

Friday, August 4, 2017

Texture stamping

Back with another challenge from my stamping group, we were to use solid stamps on a embossed background.  My tip for you is to get an embossing folder with a lot of area to stamp on and if you don't like it on the embossed side try it on the debossed side of the paper.  I went through a lot of embossing folders until I came up with the right one.  The background was also chalked before the stamping in 3 different colors of chalk.


Taylored Expressions -- Burlap Embossing folder
Inkadinkado -- Garden delight and Garden Greetings stamp sets
Spring colors chalk set
Flower gems for the centers
Wink of stella -- clear glitter pen on dragonfly and flowers on sentiment

Now this is the cool part I found doing this technique, when you ink up your stamp and then stamp it onto the embossed background you are left with that pattern on your stamp where the ink didn't apply to the background, (hope that makes sense)  Well I wondered if I could make a card using that technique and this is what I came up with :)


Inkadinkado -- Garden Delight stamp set
Taylored epressions -- Burlap embossing folder
Darcie -- Flourishes embossing border folder
Hero Arts -- May today be one sentiment stamp set
Cloud 9 design -- Rain dots

 I used different colors on the flowers in this one, I also added an embossed border strip and a sentiment that I popped up a bit to give the card a little dimension.

Which way do you like better?  I just love when these fun new techniques come from trying something else new.

Thanks so much for taking the time to stop by today and I hope you have a wonderful weekend, ours is starting off perfect, it is a nice cool morning!!

Connie

Wednesday, August 2, 2017

Eyelet frame

Since my son in laws birthday is in August and soon after they were moving I decided to give him his birthday gift a little early.  My cardmaking group was having a challenge to use those eyelets that have been neglected, remember when that was our biggest embellishment back in the day, well I decided to use quite a bit of them by making a frame with them and some thin jute.


Instead of just leaving a knot at the top I decided to hang a dragonfly charm from the top of it also.

I wonder what other old embellishments are in our stash that could use to come out and play once again :)

Penny Black-- Fantasy stamp, ink applied directly to stamp
Making memories -- eyelets
Stamps of Life -- Minis 4 circles sentiment stamp set
American crafts -- jute
Dragonfly charm

Thanks for taking the time to stop by today,

Connie