Sunday, May 31, 2020

Peace

Our Challenge in my stamp group this month was to use something that begins with the letter P and I had already done my poinsettia stamp, so I went with Peace in my sentiments.


These are from some new stamps I picked up on HSN craft day awhile back, they are from Diamond press and they stamp very well.  I tried making an oval wreath with all the stamps , they had 3 different sizes of pinecones and the pine looking stamp, plus this great sentiment.  I just added some holly and stickles to the stamping and I was done.

Diamond Press - Christmas stamps
EK Success - Vellum holly sticker
Stickles - xmas red


On this card I used one of their wreath stamps and added one of their many sentiments you can add to the inside. Cut it out with my die and added a bow.

Diamond Press - Christmas stamps
Spellbinders - Big Scalloped circles die
EK Success - Fibers

The last two were done with a big Peace stamp given to me by a friend, I added some snowflake stamps from the stamp set above for the corners, one embossed in white and the other in silver.


Peace stamp unknown
Diamond press - Snowflake stamps

So happy that I actually got 4 cards made this month, since I didn't manage it last month.

Thanks so much for taking the time to stop by again today!

Connie

Friday, May 29, 2020

Blue bird

I am back on again, hubby was able to trouble shoot and we have our internet again :)  So thankful he can figure that stuff out.

Here is another case in point that after sending the card out I realized I wish I would have went a bit lighter on my blue bird.


I have used this stamp set in the past but this is my first time using this exact stamp.  I went with a marker color to make it look like the feeder is a copper feeder.  The corner scroll sticker was a goodie past on to me from another cardmaker, it has glitter on it and I thought went with the scroll pattern in the papers.

Inkadinkado - For the birds stamp set, colored w/markers
Spellbinders - Classic ovals and Lacey Ovals dies
DCWV - Primrose Paper
Martha Stewart - Tag punch
Stamps of Life - Minis 4 cirlces stamp sentiment
Stampin up - Lg jewel
Forever in time - Glitter Lace Frames


We just heard from our Governor that all our state parks are opening up today.  We love to get out and this is such great news!  Hope you are all staying well during this time!

Thanks for taking the time to stop by and say Hi,

Connie

Wednesday, May 27, 2020

Lots of Hugs

Today I am sharing a Rose card.  I just love this die background rose pattern but haven't used it much, so it was time to pair it with a layered rose die cut that I shaped using my mouse pad and a big ball embossing stylus.  Instead of coloring or inking I decided to just go with this pretty polka dot paper for my rose and the little flowers too.  I came across my beads the other day and thought they would make pretty centers for flowers.


Tim Holtz - Mixed media #5 die
Spellbinders - Rose Creation die
Homespun - paper
Basic Grey - Brad
EK Success - Flower punch
Beads for flower centers
Martha Stewart - Tag punch
Our Daily Bread designs - Mini tag sentiment stamp


I can't get over how fast the weeks seem to be flying by, do you all feel the same way too?  Can't believe we are almost to June already.

Hope you are all doing well.
Thanks for taking the time to stop by today and say Hi,

Connie

Tuesday, May 26, 2020

Slim line

In my cardmaking group one of the girls had us try a new size card, one that would fit into a business size envelope, she suggested 8.5 x 3.5 inches.

I went looking through my stamps trying to figure out what I might have to fill that much space when I came across this silhouette stamp, I figured I could do some repeat stamping to make it fill the whole bottom of the card. I started off by water coloring the background using my distress inks, in the grassy part I tried to add some long grass strokes but they are covered up by the stamping pretty good.  I did a like how the sky turned out though. I started with the stamp right in the center and stamped, then stamped on either end for a continuous scene.


The little bee I just got from crafters companion thank you calendar of goodies, each day you open a new die, just like the advent one I bought at Christmas.  The birds and sentiment are from another stamp set.

Crafters companion - Sheena, Grass silhouette stamp and bee die
Distress inks for water color background - Mowed Lawn and Tumbled glass
Stampendous  Meadows edge stamp set (birds and sentiment)


The other girls had some fun ideas for this!  But I will have to say I like my A2 size cards still :)

Thanks so much for taking the time to stop by today, hope you are all staying well.

Connie

Monday, May 25, 2020

Tea bag stamping

Before I get to my card I just want to say on this Memorial Day I am thinking of all those men and women who gave up their lives for my freedom and safety.  Such a sacrifice they made and their families had to endure, may we never forget them.

Today I am sharing a challenge with my scrap group. Recently Splitcoast stampers had a tutorial on tea bag stamping and since I drink a lot of Iced Black tea, I have a lot tea bags.  I buy the Tetley iced tea bags and they are round.  You can find the tutorial HERE if you would like to give it a try.

I first cut out my shape of the tea bag with a die, placed it in my Misti, just in case I needed to re stamp, I did have to stamp about 3 times to get the amount of ink I liked on it.  After cutting it I looked to see if I liked dark or light card stock behind the bag. The dark cardstock made the stamping stand out better but the tea bag was a lot darker too and I wanted the tea bag to be lighter so I went with mounting the tea bag on a white piece of cardstock before putting it on my larger die cut to frame it.


Used Tea bag to stamp on
Inkadinkado - Bird Streamer stamp
Gemini - Torn Edge Circle die
Spellbinders - Blossom and Floral Motifs dies
K&Co. - Blue Awning paper
Bo Bunny - Sentiment stamp
Gem


So far I have only used the tea bags for backgrounds or layering, I like the idea of being able to stamp on them for a vintage look too :)

Thanks so much for taking the time to stop by today,

Connie

Saturday, May 23, 2020

Springtime

Still sending cards to people from church, I meant this to be a spring time theme card, when I showed my husband he said aren't you a little late for Easter.... :(  I said no this is a spring card.  I decided to use some papers from my scrap bin to use for the grass and sky.  The little birdie was cut from a piece of a colorburst background.  I cut the tree from white and colored it with markers.


Your next stamp - Woodland cuties stamp set, colored w/markers
Memory box - Debutante Frame, Orchard tree frame and Forest neighbors dies

This bunny was from the same stamp set that I did the raccoon card a few days ago. I guess I should have colored him brown, maybe then it wouldn't have looked so much like an Easter card.


Hope you all have a fun and safe weekend.  Hubby took yesterday off work so we went and got some take out and ate out on our deck in the SUNSHINE!!!  We haven't seen sunshine in quite some time so we stayed out there most of the afternoon.

Thanks for taking the time to stop by today,

Connie

Thursday, May 21, 2020

Gerber Daisy

After finishing this I rather think it looks like a fall card.

I would like to add this to the following challenges:
Memory Box-Floral cards
Flower Challenge blog - Monochrome

I went with golden yellows to color my daisy and grays for the background and sentiment label.
The stitched border dies to frame it.


Memory Box - Glorious Gerber Daisy, Country stitches and Surely Stitched circle dies
DCWV - Timeless Texture paper
Our Daily Bread designs - Mini tag sentiment
Gems


Thanks so much for taking the time to stop by today!

Connie

Wednesday, May 20, 2020

HB2U

I thought I would break out one of the sets that I bought at the yard sale at my stamp store months ago, there are so many cute critters to pick from.


Your next stamp - Woodland cuties stamp set, colored w/markers
Spellbinders - Labels One and Decorative Labels one dies
Gemini - Opulent swirls die
Teresa Collins - He said she said paper
Starform - border stickers
Gems

I added a little border sticker under the sentiment so it wasn't just floating there.


Hope you are having a good week, Thanks so much for taking the time to stop by,

Connie

Tuesday, May 19, 2020

Floral Hoop Art

When I started this blog back in 2011, I planned on sharing many crafts that I enjoy, not just card making, that is why I named my blog what I did, thinking I would share all kinds of things. Well it has turned into mostly cards because with a large family and church friends and others I keep quite busy with birthday cards and get well.

On my first post HERE, I shared a quilt I had made for my Dad, since he has passed I now use it all winter long.  My mother gave me the love of crafting, she did many crafts too.  So back in January of this year when I received an envelope in the mail asking if I would like to join Annie's Creative Woman kit of the month club I thought that would be fun to have crafts come to me and I can try to do them in the evenings when I am watching tv.

Well it sure came in handy at this time because just before my friends birthday I received the Floral Hoop Art kit and thought she would really like this, I had received others before this, but hadn't done them yet.  If you looked at the link above, the picture that is on there right now shows many colors of felt that I wasn't given in my pack, the ones you see here are the colors I received. When you start out the kit is I believe $19 but after that they are $29 so be aware of that if you decide to do it.


I did cheat a little bit, the little gray, little light blue and little cream flowers on this were all cut with dies that I use for my cards, I wanted to add a few different styles of flowers.  They suggested very big stitches all around and I went with smaller stitches, you hand cut the leaves also, the kits come with directions on how to do them.  After looking at it for a day I just thought it needed something extra so I added the french Knots.  The kit came with two hoops and enough felt to finish both of them so I plan on doing the other one for myself. I wanted to get a picture of the hoop on the wall but I didn't have any good light before I had to give it to her.

Here is a close up of the flowers.


It was fun to try something different and it was so nice since we didn't have the ability to go shopping at the time (early May) that I was able to make something for her.

As I do the other crafts I will share them here.

Thanks for taking the time to stop by today,
Hope you are staying well,

Connie

Monday, May 18, 2020

You did it!!

In my stamp group we had a challenge to do a gift card, I don't give gift cards that often, I usually either make something or buy something, but my great niece is graduating this year and although they still haven't decided on an Open House or not I will be sending her a card and check so after watching Jennifer McGuire's video HERE I decided to do the last one she showed.

I wanted small stars to go around here along with the splattering I did using a spectrum sparkle pen, I remembered a background die that punches out little stars so I used that for the stars. Her School colors are red and white but had to add a bit of silver in there :)


Silhouette cameo - Grad die cut
Hot off the press - Cardmakers Quotes
Memory Box - Starry night background die
Tim Holtz - Metallic paper
Spellbinders - A2 matting basics B die
Spectrum noir - sparkle pen for red splatters
Silver ink pen for dots

The inside, when it opens the red piece pops up, that is where you are supposed to put the gift card.


I think it is a nice little pocket for anything you wouldn't want to fall out of a card you are sending and there is still room to write a message!

Thanks so much for taking the time to stop by today,
Hope you have a wonderful week ahead!

Connie

Friday, May 15, 2020

Smooshed impression

In my stamping group one of the ladies said she was smooshing her leaves into paper to make prints of them and using them for backgrounds on her cards, another of the ladies did it too and I just loved the look. 

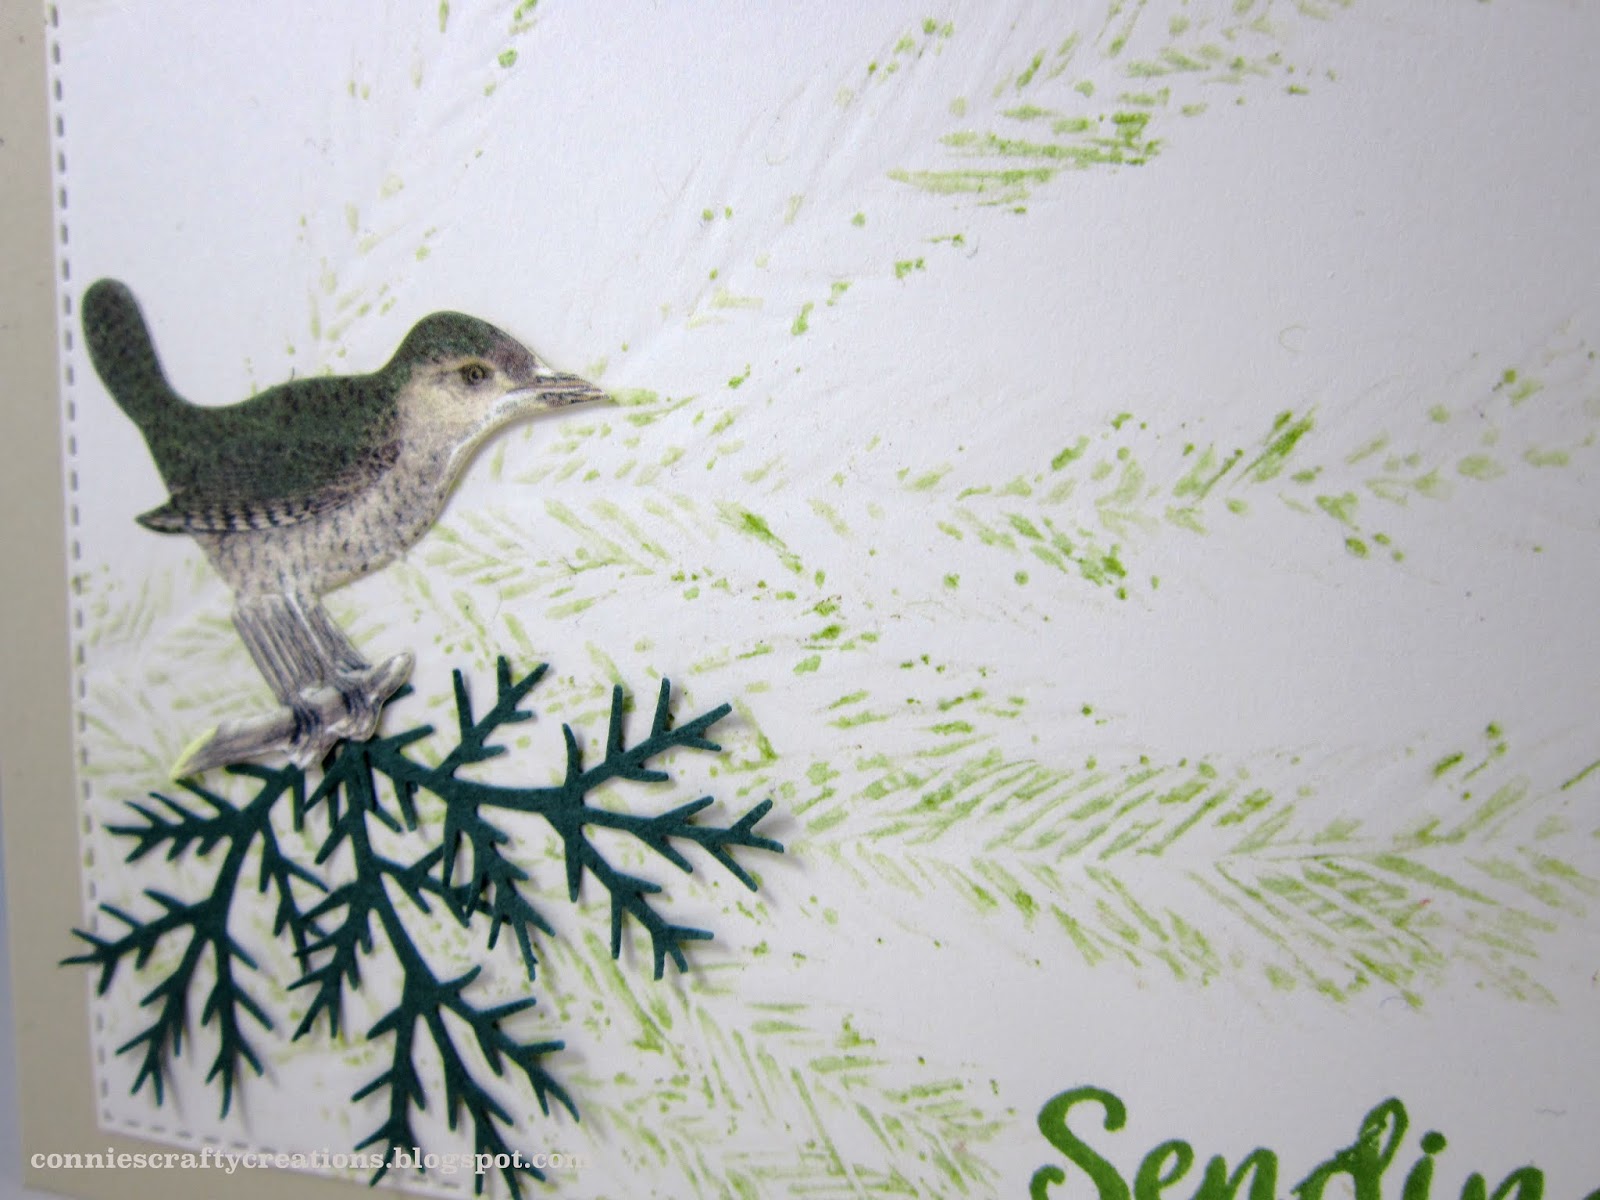
Well one day after they were showing their cards my Miniature pine tree that I have in my house had one of the branches fall off, probably from lack of watering, my bad.  Instead of throwing it out I took it into my craft room, later that day I went in and cut two pieces of paper, sandwiched the branch between the two papers, then put them into a piece of copy paper I had folded over and ran them through my cuttlebug with the A plate and two B plates and this is the results I got for these two backgrounds. I did run it through back and forth many times. I am not sure how they were doing there smooshing technique, but this is what I came up with.  It left the color from the needles but it also left a bit of an impression.


Smooshed background, using miniature pine branch, ran through cuttlebug
K&co. - Flora & Fauna die cut cardstock and vellum
Gold splatters
DieVersions - Celebrate die
Tim Holtz - Metallic collection card stock

The first card was a Feminine birthday card, the second card is a masculine card.


Smooshed background, using miniature pine branch, ran through cuttlebug
Anna Griffin - Avian Collection cardstock stickers (bird)
McGill - branch punch
Memory Box - Stitched rectangle layers die
The Greetery - Sentiment Suite : Thinking of you stamp set

Maybe you can see the impression it left a little better in this picture.


I need to trim the tree that I posted the other day that is in our back yard, some of the branches are hanging over into our neighbors yard, I plan on trying to press them with the cuttlebug too and see how they come out, I think the color of the leaves would leave a neat impression.

Oh by the way Diane gave me a suggestion of what kind of tree it maybe and when I looked it up to see, I actually found (I think) what my tree is, it wasn't the one that Diane suggested but it popped up some others that I did not get when I tried searching.  I think our tree is a Purple leaf sand cherry.  Thanks Diane for the suggestion that lead me too what I think ours is :)

Hope you all enjoy a wonderful weekend ahead of fun and creativity!
Thanks so much for taking the time to stop by,

Connie

Thursday, May 14, 2020

Iris

After finishing the card I posted a couple days ago using the embossing folder and stamps, I still had all the goodies sitting out, when putting them away I saw this Iris die cut that came in the same pack and thought I need to use that before putting this all away.  I love how it has a separate die that you layer on top to give the flower more of a dimensional look. The butterfly comes in the set too.

I have used my finger daubers and a combination of distress and pigment inks to color the flower.


Craft Essentials 101 magazine kit - Iris die,  color w/distress and pigment inks
Spellbinders -A2 matting basics A die
Memory Box - Stitched layers die
Pebbles Inc. - White Rubon sentiment


 Our Iris have all bloomed here, they look a little sad right now because of the rains and wind we have had, but last fall I took some out they were getting to compact and this year they have come up looking terrific!

Hope you are doing well and I thank you for taking the time to stop by and say Hi,

Connie

Tuesday, May 12, 2020

Triple Stamping Silhouette

Last time I made one of these cards I used a stamp that I could color, this time I went with a silhouette stamp.  You can see the last one I made HERE.

I am thinking I liked the first one I made better but I do like this one too.


I added the butterfly and the sentiment into the center of the stamp.

Inkadinkado - Garden Flowers stamp set
Tim Holtz - Vintage Shabby papers
Hot off the press - 130 tiny words and phrases dazzle stickers

I thought I would share some pictures of the tree in the corner of our yard when it was blooming back on April 6th.  I have no idea what kind of tree it is, it was here when we bought the house and it blooms every spring, the leaves are a dark burgundy and stay that way all season, it isn't a maple, it has died off and replanted itself and has never grown very tall after the 15 years we have been here.


Hope you are all staying well and Thanks so much for taking the time to stop by,

Connie

Sunday, May 10, 2020

Many Happy Returns

I had picked up this magazine that comes in a box at Barnes and Noble bookstore just before all this covid stuff hit, I decided I needed to break it open. The embossing folder and stamps came in the box.

I first embossed the background then I did some blending with my inks and my blending tool. over the embossed areas.  I then took a yellow ink and went over the center area.  I colored the stamped image with my markers and cut it out.  I felt it needed a little more and I have a roll of this loose weave mesh that I believe I picked up at Hobby Lobby a few years ago, so I put that down for a mat for my flowers to rest on and then finished it off with a little bow! Had to add a few gems to top it off!


Craft Essentials, 101 kit - Embossing folder and stamp, colored w/markers
Distress Oxide - Wild Honey
Distress Inks - Cracked Pistachio
Jute
Gems


For all of you celebrating Mother's day today I hope you enjoy your day even though most of us can't be with our kids.

Hugs,
Connie

Saturday, May 9, 2020

Flyin' by

Our challenge in our stamp group this week was to use a flourish stamp on our card.  I have a few flourish stamps from Inkadinkado and I picked one that I thought would be a nice frame for my bird stamp.  I inked up the different portions of the stamp and inked separate using my Misti stamp platform. There were a couple spots I just couldn't get well so I used my pencils to fill it in.


I used some of my white enamel accents to add to the flower centers and then inked around the sides.

Inkadinkado - Floral Flourishes and Birds Galore stamp sets
My sentiments exactly - Little Birdie stamp for the sentiment
Enamel accents - White for the flower centers


Thanks so much for taking the time to stop by today,

Hugs,
Connie

Friday, May 8, 2020

How are you?

This next card went out to the young lady in our church that plays the piano, she has been recently married and they have a little black kitty, that is why I had to add the kitty into this scene :)


A friend sent me this stamped fence a few years ago and I am just now using it, colored with markers.  I added some grass die cuts, the cat and some butterflies that are getting his attention :)

Stamped fence - unknown, colored w/markers
My Mind's eye - the sweetest things papers
Impression Obsession - small grass and cat set dies
Sentiment stamp - unknown
Butterflies from stash

Thanks so much for taking the time to stop by today,
Hope you enjoy a fun and creative weekend,

Connie

Thursday, May 7, 2020

Bee Happy

As I was looking at this on my computer I so wish I would have done the Happy sentiment die in Black, I already had so much yellow going on and in person I could see the Happy I thought but in this picture not so much, Oh well it has already gone out in the mail so too late this time.


I embossed the background in my folder and then took it out and just swiped my ink pad over the background, layered my flower on put it on the Hexagon die, the bee is in 3 layers and I used vellum for his wings.

Spellbinders - Hexagons and Anemone flower topper dies
Elizabeth Craft designs - Bees die
Paper studio - Honeycomb embossing folder, swiped with ink pad


Now when you are sharing a "bee" happy card you need to share Peach blossoms, something that makes this girl happy :)  This was from our outing on March 30th, we have a farm just down the road from us and their peach trees were starting to bloom, such a lovely site!


After we left the peach trees we went to a park for a walk and the trees were just starting to bud, and this one had some really cool buds on it, not sure what kind of tree it is but the branches were low enough I could actually get a decent picture.


There are a few trees still blooming around us but most have already lost their blooms and they are all green now, so going back and looking at these was nice!

Hope you are all staying well wherever you are!!

Hugs,
Connie

Tuesday, May 5, 2020

Coloring

 For the year of 2020 I bought a new kind of daily coloring calendar, I was going to wait to use them and then I thought why?  This one is Johanna Basford, the papers in her set seem to be a bit thicker than the others I have bought. They are a bit wider and longer too, practically 4 1/2 x 4 1/4.

I colored this first one with pencils and the second with markers, just to see which I think I like better.


Johanna Basford - coloring calendar image, colored w/pencils
s.e.i. - bright blossoms paper
Spellbinders - Lacey squares and Labels 29 dies
Fiskars - Essential sayings stamp set


Johanna Basford - coloring calendar image, colored w/markers
Wink of stella clear glitter pen
Fiskars - Essential sayings stamp
Scraps of paper

I think I liked the coloring of the both, I heard a tip somewhere I wish I would have written it down that said to use paper under the piece you are coloring that it helps pull the marker through or something like that, anyway I tried that on this one and it seemed to work ok, but like I said this paper is a little thicker than the other daily coloring calendars I have bought so it could be that too.

Thanks so much for taking the time to stop in today,

Connie


Monday, May 4, 2020

Punched Background

Our stamp groups challenge for last week was to do a punched background of one item over and over again and then to add a stamp on top.  I went through my punches and decided to use my butterfly punch and then looked for a stamp to go with it. I haven't used this stamp in quite sometime and it even comes with a die to cut it out so no need to fussy cut.

I meant to do the whole background with punched butterflies but didn't measure things out correctly so I added a piece of patterned paper to the base. I colored the butterflies with markers and added a die cut sentiment.


Martha Stewart - Butterfly punch
Our Daily Bread designs - Faith, colored w/markers
Die- Versions - Blessings die
Quick cards magazine - Floral papers


I have found that it is ok to punch out one or two items but wow anymore than that and my hands have a hard time with it, after this project I am so thankful for whoever thought to make dies to cut out our goodies :)  I can remember the first punch I bought and thought that was the neatest thing ever.  I still have all my punches too.

Thanks so much for stopping by today and hope you have a wonderful week ahead!

Hugs,
Connie

Friday, May 1, 2020

Basket of flowers

My card making groups challenge this week was to use a basket on your card.  I haven't used this Gina K stamp set in quite sometime, so I decided to make my girlfriends card with it.  I don't make many 5 inch cards but I plan on dropping this off on her porch along with her gift, so it doesn't have to go through the mail :)


The flowers are separate from the basket as are the handles, you can leave them off if you like, I attached mine with brads.  The extra flower and leaf I colored up to go with my sentiment, that I lifted up in the middle to make it look like a banner flowing in the wind.  Cut a crochet border for the basket to sit on.  Everything was fussy cut. The flowers in the basket have been popped up.

Gina K - Holiday Basket stamp set, colored w/markers
Prima - Alla - Prima paper
Sizzix, Tim Holtz - Crochet die
Brad


Thanks so much for taking the time to stop by, Hope you enjoy a fun and creative weekend.

Connie