Tuesday, June 30, 2020

Poinsettia

Do you remember HERE where I did the splitcard technique and I had mentioned I wanted to try it again but instead of using stamps I wanted to try it using all die cuts, well I still needed some more Christmas cards for this month so I went with using my poinsettia dies, they didn't fill up the area as well as the stamps did but I was very pleased with the outcome of these.


I wanted a little extra to them so I added a little more greenery to it and added some stickles to the tips to give it a bit of sparkle!  Some Liquid pearls to the center of the flowers too.  This time I did the splattering before I even started add the diecuts.  I love the look of pink poinsettias with a touch of red so that is what I went for with these.


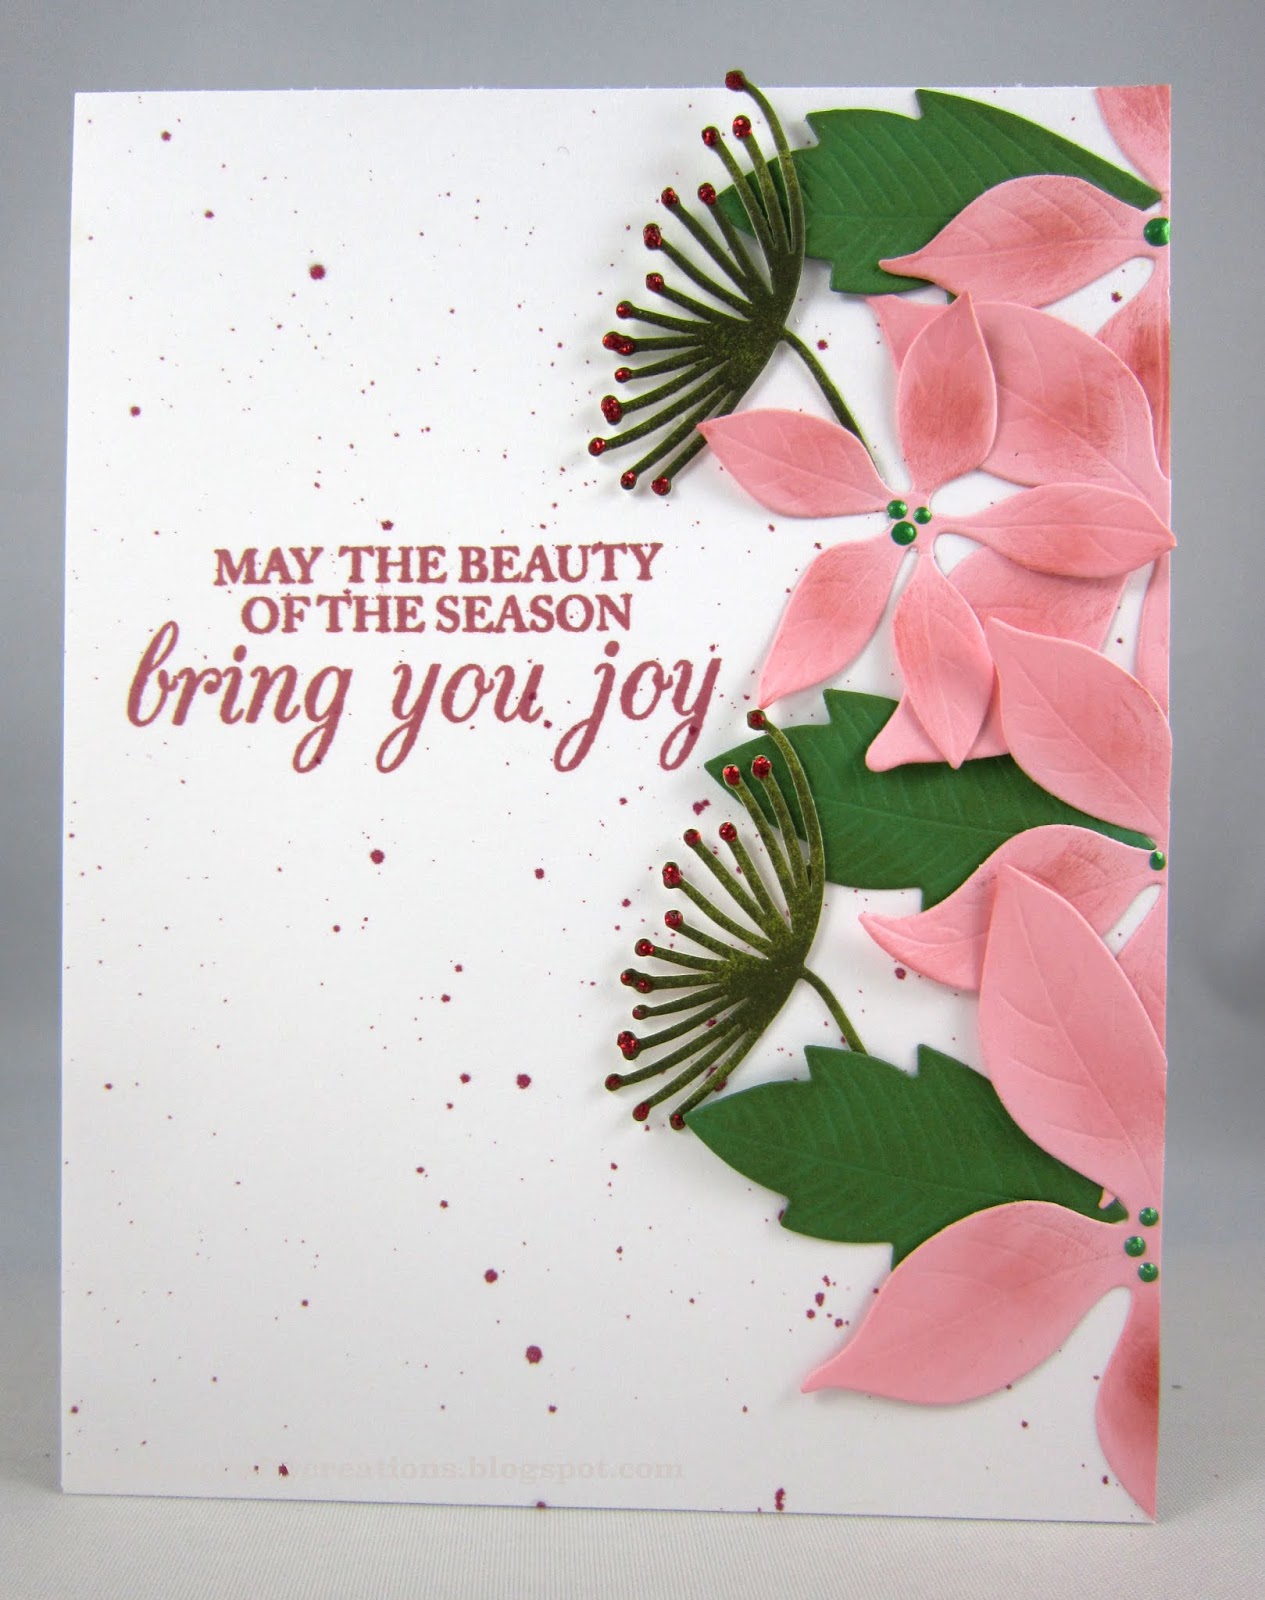
Poppystamps - Blooming Poinsettia dies w/ Distress ink Fired Brick
Tim Holtz, Sizzix - Funky florals #3 die
Hero Arts - Merry Christmas messages sentiment stamp
Spectrum noir - Red Berry Sparkle marker for splatters
Stickles - Xmas red
Liquid Pearls - Emerald green


Our house is totally surrounded by water once again, we are having such high volumes of rain and thunder and lightning, our shed is once again under water so far our house is ok.  Poor Opie our cat, between the fireworks and all these storms he is tired out and so wired up.  I was looking forward to my garden to get some water but it didn't need this much, uggghhh!

Hope your day is going better than mine,
Thanks so much for taking the time to stop by,

Connie

Monday, June 29, 2020

Birthday wishes

I haven't used this set in some time and when I got it out I decided to use both stamped images in the set for two upcoming birthdays, of course I had to change up the cards so they weren't done exactly the same :)


I went with the colors of paper I picked out, it's funny, I sometimes color first and then go through all my papers trying to find something that could go with it and other times I pick out the papers and then use those colors for my coloring, I think it all depends on my mood when I go in to create.

Hampton Art - SCO722 stamp, colored w/markers
Teresa Collins - Tell your story paper
Spellbinders - Classic Rectangles die and A2 Scalloped borders two die
Jute
Nuvo Crystal glaze for the berries
Whimsy Stamps - Simple sentiments stamp
Queen & co. - Blue Jelly gems


The next one I used a card sketch for my layout but never wrote down where I found it, sorry.


Hampton Art - SCO722 stamp, colored w/markers
DCWV - Linen Closet papers
PPD - A2 Stitched Banner die set
Nuvo - Crystal glaze on berries


Hope you had a good weekend, we had a few very heavy rains with flooding out back and out front, we have a mess to clean up but we may get more tonight so we are waiting to clean it up, don't want to have to do it twice, specially with the HOT and Humid temps we have right now.

Have a great week and thanks so much for stopping by today,

Connie

Saturday, June 27, 2020

Anniversary

My daughter and son in law have had some extra stress during all this virus mess.  The landlords that lived on the 2nd floor of the house decided they wanted to have their mother move into the downstairs apartment because she is getting older and they wanted her closer to them. The kids really loved that place and since they do more walking then driving it was in a good location for her school and his work.  My daughter is in the part of her program for getting her Doctorate that she is now helping teach classes and so she had to learn how to do that on line during the time of searching for apartments, they were not allowed to go into these apartments only view them on line because there were still people living in them.  Just three days before their anniversary they moved into there new place, they don't like it as well as the one they had so that is a bummer but she now has her own little space that she could set up for teaching on line the next semester so that is nice.

I went a little dark with these colors after I had it made but believe it or not the first card I made them ended up looking perfect for Valentines card, so I am saving that for next year, so I had to go with this to get it out in the mail :)


This is another die I have had for quite some time and not used yet, another goodie from Spellbinders that was on sale.  I don't normally do this big size of card, I believe it was a 5x7, but I do love all the swirls in it.  The flowers even come with the set. I colored them by sponging on the inks.

Spellbinders - Romantic Rose die set
Craft Smith - Chelsea Lane paper
David Tutera - celebrate sentiment

Thanks so much for taking the time to stop by, we are supposed to get some rain this weekend, hopefully enough that I won't have to go out and water all my plants.

Connie

Friday, June 26, 2020

Birthday cake

Time out challenge blog has a photo challenge this time around of a colorful cake, I thought this cross-stitch cake would fit the challenge.  This is one of those things that I have had for over a year and this is the first time I had given it a try. I have been cross-stitching since I was in High school, for those of us that are older we can remember when they offered those kind of classes in with Home education classes :) 

The die cuts out the little holes and the company has cross-stitch designs that they offer that fit right in the tag.  My die did not come with the topper, I see that some of them do, so I just cut the top portion of the tag again to give some color to the top so it wasn't all white.


I also cut into the back of the pattern paper to stamp my sentiment into it, added a little ribbon tied with jute and some sparkle gems.

My Favorite things - Cross-stitch tag, More Essential sayings stamp and Rectangle word window die
Teresa Collins - Tell your story paper
Queen & co. - Petite Posies Pink gems

You can really see the sparkle in the gems in the side view.


Thanks so much for stopping by, I hope you have a wonderful weekend!

Connie

Thursday, June 25, 2020

Split card technique

It is my turn this week in my stamp group to come up with a challenge to do in our group.  I went with another Jennifer McGuire technique. You get two cards using one technique. Perfect timing as I was in need of a get well for a lady in our church that just had back surgery and you know I am always in need of a birthday card :)

Here are the two cards together so you can see that you have one sheet of paper that you make a mark right down the center, you add your flowers to both sides of that center line going down the page, I applied mine all with glue and so I gave it time to dry and then I took my Tim Holtz trimmer that is a guillotine style trimmer and cut my card right in half giving me the two card fronts.  I cut my base (before cutting in half) to 5 1/4 x 8 inches, I wanted to have a little border around mine.

I stamped all the flowers and leaves and colored them in one setting, then came back the next day and fussy cut them all out and arranged them on the background and made them into two cards.


I forgot to take a picture before I cut them apart but you get the idea from this picture how I had them arranged.  My leaves were stamped onto pattern paper and then I added some darker grey marker to them.


Prickley Pear - Hibiscus 2 stamp set, colored w/markers
Jillibean soup - Enjoy stamp sentiment
Splatters - Spectrum Aquatint marker, Moonlight


Prickley Pear - Hibiscus 2 stamp set, colored w/markers
Words to the Rescue - Get well stamp set


I would like to try this again but with die cuts.  I don't know how you would do with a paper trimmer that is on a slide, if that is all you have maybe try and straight ruler and a knife to cut.

Thanks so much for taking the time to stop by today.

Connie

Tuesday, June 23, 2020

Farmland

I just realized that my last 4 post had some type of butterfly in them so I am changing it up today with a more masculine card for my little brother, I decided not to add a sentiment, just thought this looked like a picture and didn't want a sentiment getting in the way.

Spellbinders was having a sale on their stamps and I wasn't quite sure how to use these 3D shading stamps, and yes I bought a couple, but thought for the price it was worth giving them a try. Since I have my Misti stamping tool I was going to try and stamp the different areas with different colors but instead I went with going with browns for my stamping and my framing.

Now I will have to confess that I think the felt on my ink pad maybe going and giving off some extra specks of felt, I am not sure, I tried to remove them so maybe that is part of the stamp, not sure though.


Next time I will have to try some color and see what I think :)

Spellbinders - Farmland 3D shading stamp
Hero Arts - Wood frame die


Thanks so much for taking the time to stop by today and saying Hi,

Connie

Monday, June 22, 2020

Do not be Discouraged

One of the ladies in my bible study group has some health problems, and I wanted to send her a card to let her know I am thinking about her at this time, I know it can feel lonely when we aren't getting out as much as we use to, we haven't had our ladies bible studies since March, and those are always good for lifting each other up during anything we are going through.

I was given these scripture tags from a lady in our church to use on my cards so I thought this would be a good time.


The tag and papers are from the same company, I went with adding a big butterfly too!  The little bow is a die cut.

K & co. - classic K paper and tag
Tim Holtz - Botanical layers (butterfly)
K&co. - Bible quotes sticker sentiment
Crafters companion - bow die cut


Hope you were able to enjoy your weekend and that the week ahead is a great one!
Thanks so much for taking the time to stop by today and say Hi,

Connie

Friday, June 19, 2020

More Distress Stencil

I was able to get two more cards made using the other two stencils backgrounds that I shared yesterday in this post.  You will also see the link to a video on how they are done.

On my first I wasn't so happy with the second color of green I had chosen so I decided to use a punch border to try and hid the part I wasn't so fond of, I do like the color on top, and since I didn't want to cover that up too much I decided to use one of these pretty wooden butterflies.  I left it plain, I like the contrast.  Added a few sparkle gem stickers to the border and some ribbon. After stamping the sentiment I cut it out using a flower punch.


Hero Arts - Kelly Floral tile stencil
Distress inks - Mowed Lawn and Bundled sage
Martha Stewart - Embroidery border punch
Making Memories - Autumn splendor ribbon
Wooden butterfly
EK Success - sparkle stickers
All night Media - flower punch
Stamps of life - sentiment stamp


The next I had planned on using for a Christmas card so I used two colors of red ink.  I had no idea what I was going to do with it but like the first I didn't want to cover up the background too much so I went with an ornament die. My sister sent these Epoxy stickers to me years ago when she was cleaning out her craft supplies and I still have a couple left, glad I saved them because they work great with this.


The Crafters workshop - 477S stencil
Distress inks - Abandoned coral, worn lipstick and fired brick
Memory Box - Clairmont ornaments die
Gartner Studio - Happy Holidays clear epoxy sticker

Thanks for taking the time to stop by today,
Have a Terrific weekend,

Connie

Thursday, June 18, 2020

Distress Stencil Technique

Our stamp group challenge for this week is to use Jennifer McGruire's technique you can see HERE.
She starts the technique around the 5 minute mark.  You use your die cut machine along with your embossing mat, then lay your very inky background on top of the mat, then a stencil, then a baby wipe the same size as your card front, run it through your machine and the baby wipe lifts the ink where your stencil was.

I used two inks for mine with the center being lighter.  I like the soft touch it gave to it.  My niece in law's sister passed and I thought this background would be nice for a sympathy card.  That was the other part of the challenge in our group to actually mail out our cards, that isn't hard for me because at least 98% of my cards go in the mail.


This worked out well for the Flower Challenge blog.


Tim Holtz - Doily Layering Stencil
Distress inks - Speckled Egg and Faded Jeans
Lawn Fawn - Fancy Scalloped Rectangle die
Memory Box - Kensington branch die
Elizabeth craft designs - With sympathy die


Here are all the backgrounds I made for this technique and I have plans for the other two I will share as soon as I get them done :)


Thanks so much for taking the time to stop by today,

Connie

Wednesday, June 17, 2020

Sending Sunshine

Back to sharing more of the cards I have sent to those in my church, every time I use this die I make two cards, it only makes sense since you can use the innies on each card.

This first one I used yellow card stock for the base and then cut another using pattern paper and put them together, using ephemera piece for my focal, and I cut my sentiment strip into a banner shape,  this came together very quickly.


Taylored Expressions - Ray of Sunshine die
Tim Holtz - Botanicals Layers
Fiskars - Essential sayings stamp
Gem


In my next one I layered a couple flower punches, added some punch leaves and butterfly, again cutting my banner with scissors.  I went with adding some glitter to the center of my flower.


Taylored Expressions - Ray of sunshine die
Fiskars - Flower punch
Art Glitter - Bananan
Martha Stewart - Leaf and butterfly punches
Fiskars - Essential sayings stamp
Gems


Thanks so much for taking the time to stop by and saying Hi,

Connie

Tuesday, June 16, 2020

Blast off

Has anyone tried the Diamond dotz, I am not sure what other brands are called that are like this. If you have not seen them they are little dimensional gems that you add to a piece that has sticky surface, under them are a panel of different symbols, kind of like a paint by number and you just add the little gems using a tool that has sticky on the end to pick them up with.  Hubby knew I had wanted to give them a try and when we were in JoAnn's store just before Covid hit he found this kit that he thought my younger great nephews might like on their cards, I think there were three pieces all with a space theme.  They were small enough to find out if I would like doing it before buying a larger one.  I will say it is quite relaxing and something to do while giving your mind time to relax.


The sentiment sheet already had the stars on it so I just colored them in, using same colors on the rocket, I remembered I had stars left over from my memory box background die so I got them out and sprinkled them around. The blast I did using spectrum noir sparkle markers.  I wish I had seen Diane's post and the one she has below first because I would have tried to do something like the she had done so creative and fun.

Diamond dotz - Space set
Crate paper - Party day paper
Cardmaking and Papercraft sentiment
Spectrum sparkle pens - blast
Stars from a background die


I hope your week is off to a great start, thanks so much for taking the time to stop by and say Hi,

Connie

Sunday, June 14, 2020

Hummingbirds

Our stamp group challenge this month was to have a bird stamped on your card. Well I just recently bought these cute hummingbirds when Impression Obsession was having a sale and so you know I had to give them a try.

When you see pictures of hummingbirds some of them have very shiny feathers and although I haven't seen that a lot with the ones around here I thought I would color these cuties up with my spectrum noir sparkle markers.


Impression Obsession - Hummingbirds stamp & die set, colored w/ markers and spectrum sparkle markers for humming birds
 Teresa Collins - Tell your story paper
Spellbinders - A2 Devine Eleoquence die
Stickles - Yellow Flower Center


Thank you Esther for your help in resizing my photos that worked great but for some reason my cursor goes into the center with a blue line, hubby helped me figure out how to get it back to the left.
Does anyone ever have to rewrite something and you get a blue line instead of the normal black thin line and as you type it takes away everything you had already typed, I can't figure out how to get rid of the blue line :(  I had that happen with the old blogger every once in awhile too.

I wanted to thank Di from England for stopping in also and giving me her help too, so sweet of you :)

Hope you all have enjoyed your weekend, we enjoyed a nice afternoon out on the deck, love to be able to have the doors and windows open!!

Hugs,
Connie

Thursday, June 11, 2020

Zoom Card making

Our stamp group got together last night to do some Zoom backgrounds together.  One of the girls had a technique to share and then we all did it along, it was so neat to be able to share and ask questions of one another as we are making them, it was a lot of fun and the first time I had actually heard their voices and saw them so that was neat too!  We plan on doing it again so that will be nice!

We had our backgrounds already embossed with white embossing powder onto watercolor paper, using a stamp with a more open background I happen to look in my not used stamps basket I have and found this crackle stamp I hadn't used yet. I ended up doing 3 backgrounds last night during our zoom time, after looking at this one I just had to make this one into a card tonight.

First we were to stamp our acrylic blocks, that we use to mount stamps with ink, I used distress inks, sorry I didn't write down any colors I had used.  Then spray them with water and then put them onto our backgrounds. At first I wasn't using enough water but then after that I think I got good coverage.


Wow - Cracked Leather background stamp, white embossing with distress inks over top
Spellbinders - Fall Foliage and A2 matting basics A dies
Gina K - Life is good stamp set, colored w/ chalks and distress inks


  After cutting them out I thought I need to make another card with the leaves, their stems are so delicate I was afraid to put them in my unused basket of goodies, I was happy with the two cards I got from this one background.


Wow- Cracked leather stamp embossed in white, distress inks
Heartfelt creations - HCPC 3381 sentiment stamp
Jute
Button


These cards will be going into my box of extra cards to use for Birthdays this fall so I have a few already to go :)

I had to try the new blogger, I couldn't get any of my pictures to load with the old.  I noticed we can't size our own pictures now, so curious how they will look now. 

Thanks so much for taking the time to stop by today,

Connie

Tuesday, June 9, 2020

Thinking of you

In these times everything seems so upside down and crazy, but I wanted to send one of the guys in our church that is a policeman how thankful I am for the job he does and that I am thinking of him at this time.  I know there are bad people out there in every field of work, but there are also some amazing people that go above and beyond their jobs to make the world a better place and we can't forget them at this time either. It takes someone special to do that job and I am thankful that they do it.


Anna Griffin - Avian Collection (Bird)
Crafters Companion - Hessian embossing folder
Memory Box - Stitched Rectangle layer die
Tim Holtz - Small tattered florals die (branch)
Bobunny - Sentiments stamp
Spellbinders - A2 Distressed edges die


Thanks so much for taking the time to stop by today,

Connie

Sunday, June 7, 2020

Jungle

I had this lizard image in my daily coloring calendar and I thought it would be perfect for my great nephew that loves animals.  They use to have snakes not sure if they still do, but thought it would work good for his birthday.  I had this embossing folder I had yet to use that made me think of the jungle. I inked the folder before embossing, but accidentally inked the deboss side of the folder,  but thought you know it didn't look bad so I added some more green ink over the whole background.


Johanna Basford 2020 coloring calendar image, colored w/pencils
Ms. Sparkle & Co. - embossing folder, inked w/ memento bamboo leaves ink
Distress Oxide - Bundled Sage ink over the background
Papercraft inspirations - sentiment stamp
Dragonfly button
Liquid pearls - emerald green

To finish it off I added a dragonfly button and some nuvo drops.


Hope you have been enjoying a good weekend, thanks so much for stopping by,

Connie

Saturday, June 6, 2020

Chalk Background challenge

Our stamp group challenge this week was to do a background using two background stamps. The first background you stamp using an embossing ink, let it dry. Then using chalks and a cotton ball you add chalk over the background. Then take a second background stamp and stamp over that using a darker ink.

I am going to share the second card I made first because I love how the background turned out on it.


I layered two wreaths on top of one another, the bottom wreath from black and the top from brown card stocks.  The bird is a layered stamp. Added some leaves and flowers.

RubberStampede - Geometric swirl background stamp, Stamped with Versamark then chalked with brown and tan chalks
2nd stamp - Fun Stampers Journey - Canvas prints background stamp, using Memento Rich Cocoa
Memory Box - Grapevine wreath die, cut from Black and Brown card stock
The Greetery - Robin and Wren stamp set
Martha Stewart - Flowers, Leaves and tag punches
Our Daily Bread designs - Mini tag sentiment stamp


My second card I was going for a Christmas theme, and hoping the background would look like a quilt since "Q" is our letter of the month to use.


I used the same swirl background but added a plaid on top.

Rubber Stampede - Geometric Swirl Background stamp, with versafine and then using red and green chalks over it
Stampin up - Stippled Plaid background stamp, with Fired Brick Distress ink
Diamond Press - Christmas stamp, using red berry sparkle pen


I don't have a lot of background stamps but like how these turned out.

I will be linking these with the
Simon Says background challenge

Hope you have fun creating this weekend!

Connie

Thursday, June 4, 2020

Country wreath

I am sharing more goodie that came from the thank you calendar of goodies from Crafter's Companion I bought off of HSN on their craft day.  This wreath is so cute and I decided to add along a thank you die cut also that came with the Christmas advent calendar from them too.

This went out to a couple in our church, the husband does a lot of work around our church, right now he is heading up the remodeling of our bathrooms so I used wood for the background. The wreath and the flowers for the wife :)


I thought it still looked to bare so I added the nuvo drops in gold and then decided to add a couple border stickers to give something to the bottom.

Crafters companion - Wreath and thank you die
Punched flowers
Homespun - signature collection paper
Hot off the press - 62 thin line border stickers
Nuvo - Pale gold drops


Thanks so much for taking the time to stop by today,

Connie

Wednesday, June 3, 2020

Thank you

One of the girls in my card making group sent me a package of goodies and she mentioned she really is curious how I was going to use them.  There were card bases in pinks and purples with matching envelopes, papers, vellum and all kinds of flowers, buttons and other embellishments. I decided to make her a thank you card and show her how I used some of them.


Paper, flowers, vellum from fellow card maker
PPD - Mini Scalloped borders die
My sentiments exactly - Little birdies sentiment stamp
Stickles - Stormy night (flower centers)


The next day I went to clean up my desk to make my next card and I needed a birthday card for one of the ladies in the same group so I decided to use the same papers and goodies to go with a stamp I had.


I used MFT sketch #70. I thought this stamp went well with the tea cup vellum she sent.  That bird gave me some hassles, I wanted to do purples with a yellow belly.  I wasn't happy with my first attempt, I waited until the next day, sometimes things look better the next day, nope not in this case it was still awful, so I tried stamping just the bird portion again and giving it another try, believe me this one was better, but still not happy with it, the inks in my spectrum markers just didn't want to blend or something but it had to go out in the mail so I fussy cut out this bird and glued it on top of the other bird.


I wanted to thank Nette for her comment on my last post, I wasn't able to see a blog to go to.

Mid week already, hope you are all enjoying your week, it is already 81 this morning so it is going to be a hot one today, inside work today it is :)

Thanks so much for taking the time to stop by today,

Connie