Tuesday, July 31, 2018

Sketch Challenge

I haven't participated in a few sketch challenges with my cardmaking group but when this one came up I knew I had many of these pieces in my 6x6 inch paper packs and it would be perfect to use some of them.  These all came from the same paper set.

I had no one in mind for this one so I thought I would make it a card just to say Hi when the time arises.


To make the background I applied some of my sparkle pens to my non stick craft sheet, added a little water and using a paint brush splattered the background, you can't see it in the pictures but it added a touch of sparkle.  The sentiment sticker is originally silver but I colored it with my markers so it went along with the colors in the paper better.


I really don't know what I think about this card, do you ever make something and just not sure what you think?

BasicGrey - Picadilly paper
Spectrum Sparkle pens - Sage and Biscuit for background
Hot off the press dazzles - 130 tiny words and phrases, colored w/marker

Thanks for stopping by,

Connie

Monday, July 30, 2018

Daisy

Ok I don't know if there are many purple daisy's but in my dreams there are and they have a metallic sheen to them :)

The more I use these markers the more I am learning, they don't do well going over an area to many times, just lay one swipe of color.


I decided to emboss the sentiment with gold embossing powder to keep the metallic theme of the card and added some gems.


Darcie - Large Daisy embossing folder
Spectrum noir metallic markers
Technique Tuesday - Happy Birthday stamp set, embossed with gold
Gems, colored w/markers

Wishing you a wonderful week ahead!

Connie

Sunday, July 29, 2018

Sent with prayer

Using another of my Daily Coloring calendar images to send a little sunshine to a friend who isn't healing very well from surgery.

I colored this one with pencils, I found something that seems to make coloring with my pencils better, I am using a magazine underneath and it seems my coloring is much smoother, I am finally liking the results.


After cutting out the flowers I poked a whole on either side of the right stem and tied my tag with the jute.

Color for calm calendar image, colored w/pencils
Martha Stewart - Embroidery border and tag punches
Our Daily Bread designs - mini tag sentiments
Jute


Thanks so much for taking the time to stop by today and say Hi,

Connie

Friday, July 27, 2018

Life Imagined

I use old calendars for making my envelopes for my cards at times and when I had finished with this one and I was putting the back cover in my recycle bin I saw the small pictures of each of the months on the back and thought they would make great fronts to cards also, and that is where this image came from.  I use a die cut to frame and then thought of an old dogwood punch I had that would go with it.  I added some lines to the flower using my foam mat and stylus tool and then inked the center.


Calendar image
Spellbinders - Lattice rectangle die
Pawsitively Pawsome designs - Mini stitched square die
McGill - Dogwood punch, used stylus to make creases in flower
Antiique Linen distess oxide for edges
yellow ink for center
Martha Stewart - Green gemstones

Wow has this week just flown by, I wish you all a wonderful, fun and creative weekend!

Connie

Wednesday, July 25, 2018

Happy Happy Happy

My great nephew likes to play baseball so I went with that theme for this card.  The ball stamp and die comes with this stamp and die set so I had to add the dog, and those google eyes I found at a stamp store are so fun to add to the eyes.


Paper piecing for the sky and ground and the tree and leaves are from two different die sets.


I hope it put a smile on his face :)

Sizzix- Dog Talk stamp and die set, colored w/markers
Poppystamps -  Stitched landscape die
Memory Box - Bare Sapling die
Dee's Distinctively - tree toppers die set
Pawsitively Pawsome designs - 3 mm wiggle eyes
Our daily Bread designs - mini tag sentiment stamp

Thanks so much for taking the time to stop by today!!

Connie

Monday, July 23, 2018

Christmas in July

How many Christmas cards do you have done so far?  I will have to say I don't have as many as I had hoped I would have done by now but it is growing and today I was able to add another.

The House Mouse and Friends Monday Challenge Blog has a Christmas theme or if you don't have a Christmas themed stamp anything goes.  I am once again posting a card as Guest Designer on their blog today so I had to go with my Berrying Gifts stamp.   The best thing about Christmas is the gifts we give others and the most precious gift we received which is Jesus!

This little guy is giving his precious berries, isn't that too sweet.  I added a bit of sparkle stickles to show it has just started snowing.


So stop by the blog and see the great goodies you could win by playing along on this challenge.

Stampendous- House Mouse Design - Berrying Gifts stamp, colored w/markers
Memory Box - Stitched Rectangle layer die
Fancy Pants design- Saint Nick paper
Stickles - Diamond for snow

Thanks so much for taking the time to stop by today and have a wonderful week,

Connie

Saturday, July 21, 2018

Country truck

Ever since I bought my Black Mirror Card stock I have wanted to use my truck diecut with it. Today I am sharing the last challenge I did which was using either mirror card, foiling, mega flakes, to bring some shine to our card.  That was all I needed to make this card for my oldest brothers birthday. 

I decided to go with Mega flakes for the leaves on the tree, I used the flutterby glue to add to the stamp with a cosmetic sponge and then stamped onto the tree again and added the mega flakes. I also used my metallic cardstock for the sun.  The challenge also had to make a matching envelope so I once again stamped onto the envelope first with my brown ink and this time instead of using the liquid glue I used my glue pen to add some glue to the leaves area and added my flakes, I feel like that may have worked better.


My card base was black so I left the bottom portion the card base, adding a white line for the road. Inks to the white background, using my home made cloud template for the sky.


Taylored Expressions - On the road truck and sun die
Black Mirror card
Penny Black - Fantasy trunk stamp
Indigoblu- megaflakes - Morris Dance on leaves
Tim Holtz - kraft core metallic cardstock for sun
Distress inks - Mowed Lawn and Tumbled glass for background

We are enjoying a day in the mid 80's with less humidity, was able to go on a walk and not feel like I was going to pass out, that sure was nice.  Hope you are having a nice weekend.

Thanks so much for taking the time to stop by today,

Connie

Friday, July 20, 2018

Artist training coins

I don't feel I really did a great job with this challenge but I wanted to share with others that may have not heard of this like I hadn't heard of them at the time.

Artist trading cards are cards that you create that are 2 1/2 x 3 1/2. The coins are 2 1/2 inches round. If you are interested you can read about them HERE.  They can be very detailed I went a bit simple on mine.  The challenge was to do your own background on the coin and stamping.  If you wanted you could make it into a card, which is what I did, a lady from church was admitted to the hospital for pneumonia, so I made her a card using it.  I used the Distress Oxide inks for the background, I added a touch of water to give the speckled look to the background..  The background paper was from a cardmaking friend she sent in my birthday card in March, I thought the stitched swirls went well with the swirl in the stamp.


The die cut I used was 2 3/4 inches but if I only added ink to the center part it made it 2 1/2 inches so while the paper was still in the die I added the ink.

Spellbinders - Standard circle lg., curved rectangles and ribbon tags trio dies
Stampin up - of the earth stamp
Distress Oxides - Peeled paint and worn lipstick
Hero Arts - Everyday sayings stamp set

I hope you all enjoy a great weekend!
Thanks for taking the time to stop by and say Hi :)

Connie

Thursday, July 19, 2018

Bubbles

This next technique was a little messy but fun, and you never new how it was going to turn out, I was going for a sunset look but ended up going in a totally different direction with the card I made.  I used 3 different colors of paint, I didn't do any measuring just added my paint, then some water and dish washing soap, mixed them and starting blowing with a straw, now this is a bit messy so you want to have some papers down when you are doing this but since there was soap in the mix I think clean up went quit quickly :)

Heidi shares HERE how she went about doing hers.  I added a bit more bubbles and more colors on mine. 


Americana acrylic paints - Blueberry, Golden straw and Georgia clay
Our Daily Bread designs - Sisters stamp
Spellbinders- A2 Devine Eloquence die
American crafts - Ric rac
Martha Stewart - tag punch
Stamps of life - minis4circles sentiment stamp

Here are the other backgrounds I made.


Thanks for stopping by today :)

Connie

Tuesday, July 17, 2018

Off stamp

The next challenge one of the girls had was to take a background stamp, and stamp it 3 times using different colors moving the stamp just a little bit every time you stamp.

These were my tries.


Sorry about the lighting, but this gives you an idea.  For this card I used the last background I made which is at the bottom.


Stampinup- background stamp (plaid)
Distress oxide inks - Antique linen, fossilized amber, walnut stain
Heartfelt creation - Delicate Asters stamp and dies, colored w/spectrum markers
Martha Stewart - border punch
My favorite things - Label maker sentiment stamp
Kaiser - gemstones


I am glad I kept going trying other background stamps because I love how this one turned out.

Thanks for stopping by today,

Connie

Monday, July 16, 2018

Challenges

Good Monday Morning to you all, we are starting the week off very HOT and Humid but they are reassuring us we will have a few days this week that aren't so humid and in the 80's!!!

This week I would like to share some challenges my stamp group had last week, I wasn't able to do all the challenges as it was a busy week around here, but I did manage some of them.

Today I will start off the challenge I had for us to try, I found this video HERE that I loved the water color look of the background and it was done by using waterbased markers and since I am always trying to find new ways to use my Spectrum Aqua markers I thought I would give it a try.  Now I wanted to have a little bigger area to work with so I used a Quart size bag and I really think I should have used a sandwich bag because the quart size is a bit stiffer material and I don't know that it worked as well, I wanted to try again with a sandwich bag but just didn't get the time.


I applied Moss and Rose Stem colors for my green in a checker board pattern on my bag, hoping to get a mix of greens not all one tone, doing the same for the browns I applied Sepia and Chocolate. I stamped the trees a couple times but didn't get great coverage on the watercolor paper so I ended up Stamping again with Distress Oxide in Walnut stain and embossed with clear powder and that helped it stand out more.

Inkadinkado- Fall trees stamp
Spectrum Aqua markers- Sepia, Chocolate, Moss and Rose stem for background
DCWV - Once upon a time background paper
Spellbinder die

I will try and post a challenge a day this week but I am not promising anything, so funny how life gets in the way :)

Have a terrific week and thanks for taking the time to stop by,

Connie

Saturday, July 14, 2018

Flower Burst

I picked out the paper first for this card, sometimes I start with my paper and sometimes I just color and then figure out which paper will go best. I colored the die cut with Spectrum noir markers.


As you can see in the close up I had another blop of my stickles on the yellow flower, I also took the little flowers that fell out of my border punch and added them to the flowers.


Spellbinders- A2 matting basics B and Flower Burst dies, colored w/markers
Sassafras - Mix and Mend paper
Fiskars- Border punch
Gina Marie- Birthday words
Stickles - Vintage Photo and Baby blue

Hope you enjoy a wonderful weekend, stay cool and thanks so much for taking the time to stop by and visit,

Connie

Thursday, July 12, 2018

Birthday wishes

Using more images from the instant card art, I love these for those times I am running behind and need to get a card made quickly.


The flower image and the white piece behind can come apart, so I took them apart and popped up the flower and then found this pretty die that would frame it perfectly.  I used the same green card stock to mat the border strip and the sentiments, of course I had to add some bling :)


K&co. - Hannah Card stock pad
Hot off the press - Instant card art for images and sentiment
Spellbinders - Captivating Squares die
Craftaroo - Clear gems

Hope you are all well, and staying cool. 
Thanks so much for taking the time to stop by,

Connie

Monday, July 9, 2018

HMFMC #270-ANYTHING GOES/OPTIONAL THEME 'HOT SUMMER DAYS"

I forgot when I posted earlier that since I won last months House Mouse challenge, they asked if I would like to do a post for their themes this month.  The one this time is Hot summer days.  Boy have we had those around here, when we go for our walks we try to find the most shaded areas and this little guy is doing the same, he is relaxing underneath a flower to keep that harsh sun off of him.

I colored the image with my Spectrum noir markers, adding a few stamped blades of grass for the pot to sit in and stenciled the sun and clouds.


If you would like to play along check out the House Mouse challenge HERE they have some great prizes that they give away, and some great inspiration from their design team.

Stampendous-House mouse- Potted Mouse, colored w/markers
RS Tapestry - Grass blades stamp
Joggles - Sunshine Stencil, using Distress inks - scattered straw and Spiced marmalade
Homemade cloud stencil - using Distress ink Tumbled glass
Memory Box - Stitched  Rectangle layers die
Wink of stella - clear glitter pen on sun

Thanks so much for stopping by,

Connie


Vintage flowers

I so love the look of Vintage and I would do it all the time except I try to make cards that go with the person I am making it for, so I am not able to do it very often.  Sorry I don't have the name of who makes the paper, it makes such a great finished background .  I had stamped a few of the flowers for other cards and never used them, so I only had to stamp one and the leaves to make my card. Fussy cut them and the sentiment stamp set comes with the outline box stamp to stamp your sentiment inside so I did the box with black ink and the words with green ink.


Altenew - Vintage flowers stamp set, fussy cut
Whimsy stamps - simple sentiments stamp
Cloud 9 - raindrops

Hope your week is off to a great start and thanks so much for taking the time to stop by and say Hi :)

Connie

Saturday, July 7, 2018

Chickadees

When I went to the stamp convention back in April I saw a card made with this chickadee stamp that was just gorgeous, I loved the layers, they had done theirs in tones of blue, I just had to get it and I had in mind I wanted to do it for my sisters birthday.  This card is a 5x7 size.

I started by looking at images of chickadees and when I saw pictures of ones with yellow bellies I just new that is the way I had to go since my sister likes yellow. I decided instead of doing all paper piecing like the one I saw I would color the belly area and just piece in the parts that were dark.  As I was stamping on the dark paper so that I could cut out those pieces I realized why they didn't use dark pieces on their example, it is really hard to see dark ink on dark paper.  I was going to pop up those areas but it just didn't look right so I just glued them directly on top.


I first started by stamping the whole stamp onto the patterned paper. Coloring in the branch.  Then I stamped again unto my white cardstock and colored with my Spectrum noir markers the birds, then I cut them out and then finished by doing the dark areas with paper piecing.  I added their eyes in with some black enamel dots so they would stand out.  Finished off with a sentiment and corner detail and a few clear dots to give the look of early morning dew.


Stamplistic - Chickadees colored w/markers and paper pieced dark areas and birds
DCWV - Timeless Texture Stack papers
Enamel Accents - black for eyes
Spellbinders - 5x7 matting basics die and Special birthday sentimentsstamp
Poppystamps - Colonade corner die
Our Daily bread designs - Mini tag dies
Faux pen stitching
Button
Floss

We actually have a cooler day today in the 80's and less humidity, we have some outdoor fun planned today :) Hope you have some good weekend plans

Thanks so much for taking the time to stop by today,

Connie

Wednesday, July 4, 2018

Coolest Cat

Aren't these two just cute, my great niece is celebrating her 9th birthday, thought she might like these two wishing her a Happy Birthday!!


The bowl and yarn are part of the stamp set also and they all come with dies so it was easy cutting all of these out, I popped up the cats with foam tape.  That cute sentiment is part of the set also :)


Taylored Expressions- Max & Muffin stamp set, colored w/pencils
Papertrey ink - Paper
Spellbinders - A2 matting basics A for base and sentiment tag and Circle Delight dies
Sequins

Hope you are all enjoying a wonderful day today Celebrating the 4th!! It is just way too HOT here!  We have decided to find activities to  do indoors. 
Thanks so much for taking the time out to stop by,

Connie

Monday, July 2, 2018

Never seen before

I always have a hard time naming the blog titles, I am not very creative that way, but all that kept coming to my mind is I have never seen anything like that before :)

Our last day in the Northern part of Michigan we took a little drive down M 119, which they call the tunnel of trees, as long as we lived in Michigan I don't think we have ever gone down this road, it was a beautiful drive and I was driving, it is just a two lane road with glimpses of Lake Michigan on one side and trees and forest. There are some very lucky people who live along this drive and their houses are just beautiful.  I didn't take any pictures until the very end when there was actually room for me to pull over and get out and the side of the road was nothing but these pretties.


Then we got back in the van and was driving out of the tunnel when we came upon a farm, now I wasn't really paying attention to the gate of their farm but hubby noticed it and he said Oh how cool, so of course I had to pull over and see what he was talking about and this is what he saw.


In case you can't make it out here is a more close up picture.


Yes you are seeing that correctly those are trees on either side with the roots still attached at the top, isn't that ever so clever and so cool, I have never seen anything like that before. I love when you are just driving along and see something really interesting like that :)

Well that is it of our trip to Michigan.

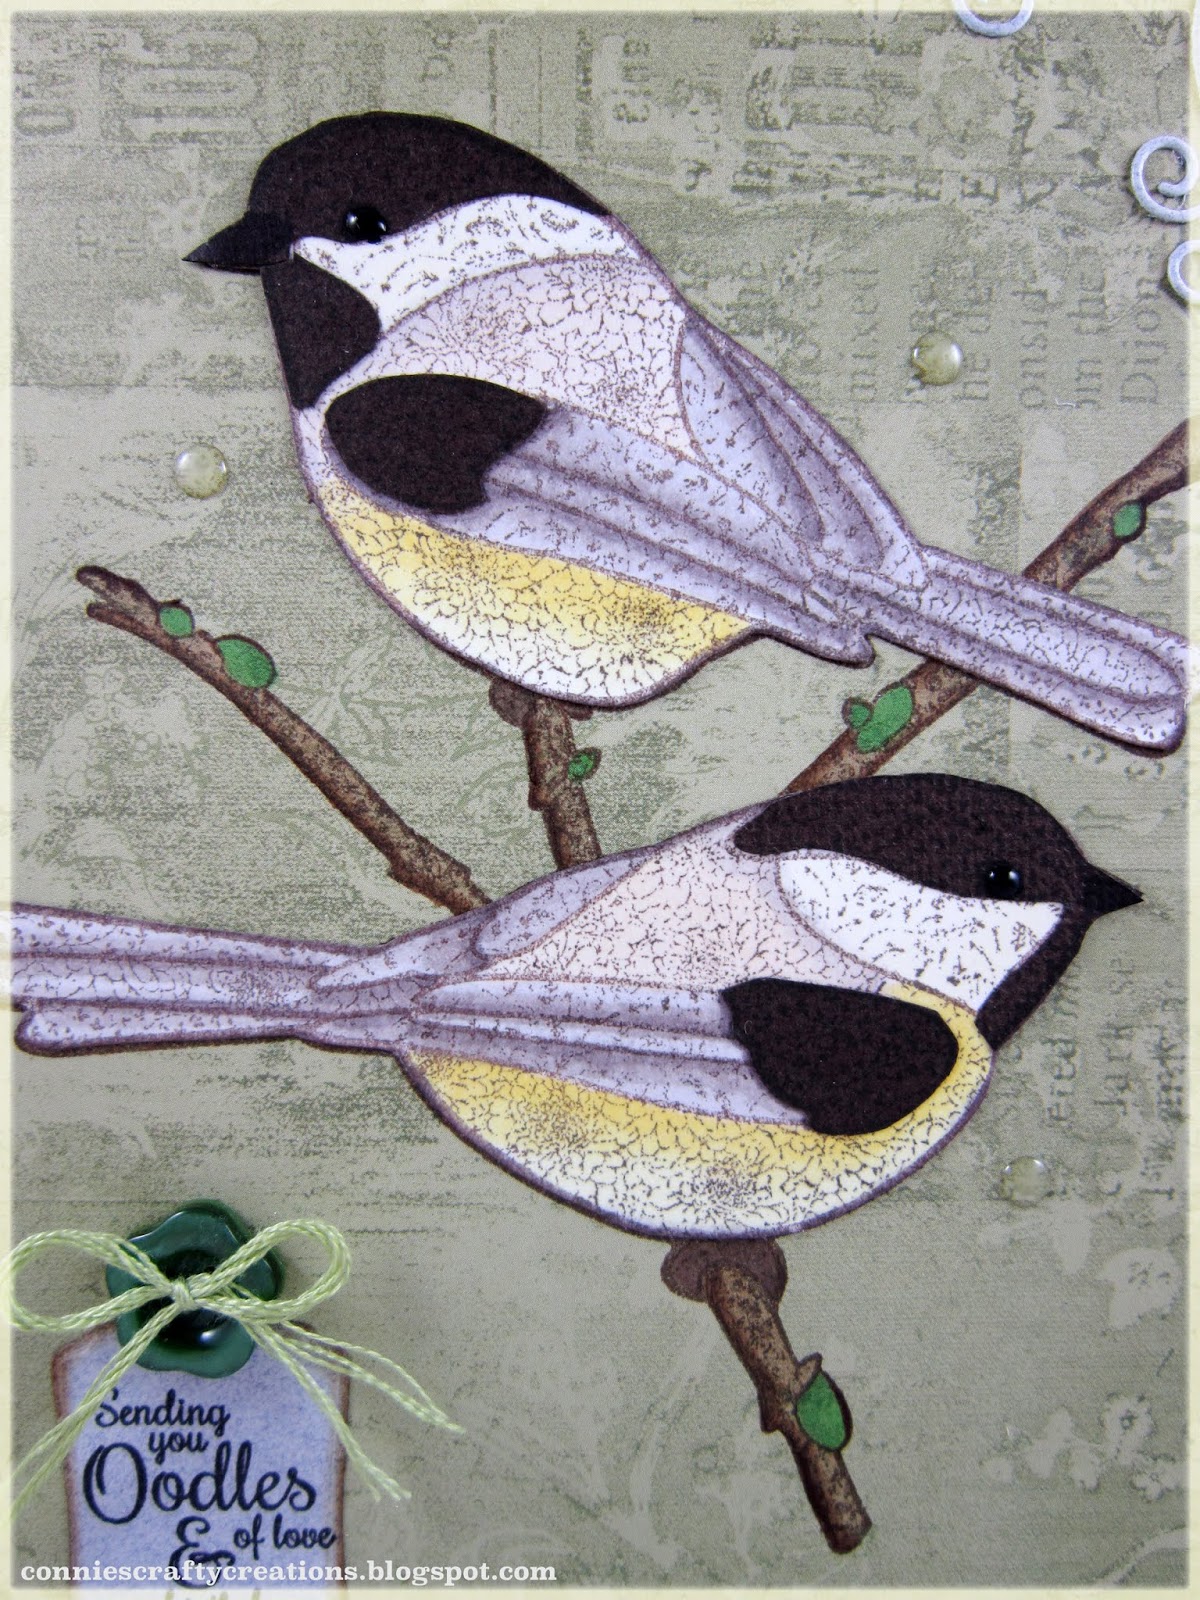
I made another card using goodies from Make Special cards magazine July 2018 issue, they have preprinted goodies to use and they also had sweet bird stamps so you can color your own. I used the preprinted images, sentiment and papers, I added my own die cuts to frame it even more and  added a border punch too.


Do you see that one of my stickles dots are a bit bigger than the other, oh my that just popped out of the bottle, thankfully I was able to somewhat get it all in a big circle, you really have to watch out for those air bubbles :)

Make Special Cards July 2018 issue, image, sentiment and button
Fiskars - Border punch
Spellbinders - Lacy squares die
Cotton thread to sew on button
Stickles - Broken china

Hope your week is off to a good start, thanks so much for taking the time to stop by and say Hi,

Connie