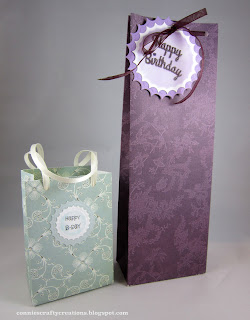
I am showing it in two
different sizes to give you an idea of the different sizes you can achieve with
this but there are many different sizes you can make depending on the size you
cut your paper.
I wanted to show you that they have great
picture instructions as long as a description on how to score and punch your
paper to make these bags, and they even come with their own score tool that
stores right in the base so you won't lose it. The tall bag started as a 12x12 inch piece of paper and the smaller one started as a 11x6 inch piece of paper. I am showing in this picture the different ways you can add holes to the bags. The tall bag I used the punch board that has a whole punch on it and created hole punches all around, that way I can add my ribbon all the way through to keep the bag tied shut tight. The little bag I used my Crop a dile to add my own holes to add the ribbon.
Here they are both finished
with their tags, I love the different sizes you can make depending on the size
gift. I used more heavy duty paper for the taller bag and a thinner paper
on the smaller bag.
Here is a close up of
the tag on the taller bag. I cut the sentiment die twice, using my
cuttlebug and plates, glued them together for more bulk and added glossy
accents to make it stand out a bit and used Dusty concord Stickles to dot the
i. I love my craft mat for blending inks as I did on the tags also, while
my paper is still inside the die.
Here is a close up of
the small bag, I just added the tag directly to the bag on this bag, but you
could add it to the ribbon before adding to bag.
Here I wanted to show
that I made the holes too big for the size ribbon I used so I applied the
ribbon to the inside of the bag with my scor tape and then with scor tape again
I added strips of paper to the inside to cover my ribbon ends, but if you do
the holes smaller you can just tie the ribbon ends on the inside of the bag.
I hope you have fun making up
your own bags and you can even match your cards with your bags for a nice set
to give to someone.
Here are all the links to the products I used from Cropstop
Thanks so much taking the time to stop by today, and I hope you have a wonderful weekend,
Connie


15 comments:
Those bags are gorgeous! They would cost a fortune if you bought them. Great job!
So happy you could guest design for us today! Thanks for sharing your lovely gift bags and a great tutorial with us today!
Congratulations on being guest designer. Your bags are lovely. Nice work on the tutorial Connie
How beautiful and elegant!Hugs,dear friend!
WOW! These are fabulous! Congrats on your guest designer spot! (I'll be guest designing for them in October! LOL) I have all these boards and never think to use them! Thanks for awesome inspiration ... might even be a good idea for my November show! Thanks again!
Those bags look absolutely professional! Beautiful job on these, Connie, and congrats on your guest spot. You were a good choice for them!
what a great job you did connie. i always say i am going to do this and then i don't. i'm going to bookmark this!!!
Oh so FUN! They look so easy to make AND how pretty! I am running through all of my DP in my head now lol
Love these. They are so pretty!
I'm late in commenting... Love the bags, Connie! What a wonderful idea for every occasion. I have so much designer craft paper that I need to do this. It is simply scandalous what gift stores charge for bags like these. Making your own is not only more economical but more beautiful as well! Thank you for sharing this with us!
These are darling, Connie! I love the addition of the ribbon....what a sweet detail. I definitely want to make some of my own this holiday....thank you so much for your inspiration! :)
These are fantastic gift bags!! Thanks so much for stopping by!!
Hugs,
Deb
WOW...I love them! I have tons of scrapbook paper I can use and try making these pretty bags!
Congratulations to you on your GD spot! Your bags are so pretty and beautifully decorated.
Such lovely gift bags ...
All the best Jan
Post a Comment