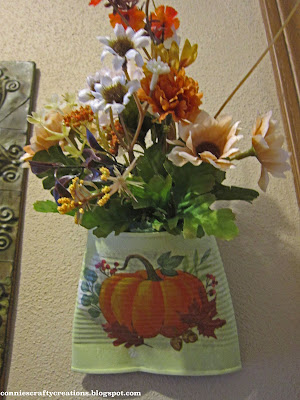
I saw tin baskets on Pinterest and just thought oh that would be cute to make, I did one a year ago for spring but forgot to take a picture of it and it is now packed away with the spring decorations. These are the other project I did with napkins I was given shown HERE
I took tin cans, you have to find the ones with straight bottoms like the tops, a lot of cans now have rounded bottoms because you need to remove both ends. Crush the bottom half of the can so that it is flat and your top is kind of an oval/round shape. I painted these with acrylic paints. After I let them dry over night I decoupaged the napkins on top. The leaf one has had many pieces cut out and layered together to make it full. I took a small paint brush that had been dampened with water and went around the image I wanted, then I gently pulled away at the area I had dampened and it left a nice feather torn look, let that dry and then decoupaged on top of the can. Some I added ribbon to them.
This first one I took the Wire from a notebook that I had used up, added some buttons to the loops of the wire and put it through the holes I made with my Crop a dile. Cut some florist foam to put inside the can and added my flowers, some bought from Michaels and some from the dollar store. This was painted with a light green paint.
Here is a pick of how I did the hanger on this one. As you cand see I also didn't fill it full of flowers, when it is hanging it looks full though. This kind of hanger works well when you are hanging from a peg like in the picture, but I found another hanger that works better if you want to hang it from a nail.
This second one I was trying to figure out where I wanted to hang it and I had a spot on my shelf that I thought it would look nice and it just so happens the tin stood up with no problem so on the shelf it went.
The way I did the hanger on the next two was to once again cut two holes with the crop a dile but then made little loop and took my needle nose pliers to add curls on the ends so it would go through the hole. Sorry my picture is a little blurry. The color in this close up is the color I painted it with an off white, the picture above shows it yellow.
This last one is a napkin I found at the grocery store and I thought they were cute so I picked them up.
I ended up cutting the top of the flowers off but it was the best picture I took of the napkin, this is hanging from a nail in the wall.
I have this one in a hallway that is very dark until later in the evening when the sun is going down but I didn't want to wait another day to post, so it is again looking yellow but the paint is an off white/Cream color.
So there you go, you could make these for every season which is what I am thinking of doing.
Thanks so much for taking the time to stop by today,
Connie


11 comments:
What beautiful and clever upcycling projects!! Love that!
I love your up cycling and your project is so very pretty Connie, would make a lovely gift and the front pictures would be endless, I love it..
luv CHRISSYxx
Ohhh, I love these so much, Connie! You are one crafty gal! That's a great way to use the napkins and keep a few cans out of the landfill. I see all kinds of possibilities. I never would have thought of keeping the curly notebook wire. What a great idea! So pretty and fun and wonderful little gifts!
It looks pale green to me. I like it!
Super cute! I've seen these on Pinterest too and have even pinned some but have never made them. Great job! :)
My goodness Connie, you blew this project out of the water. These would make nice gifts for friends and family. I love the napkins you chose. Wow.
They are beautiful, Connie xoxo
Oh these are great! They are on my list to make too lol I guess as crafters our list is every growing! You did a great job, I love that you can make them for every Season and all occasions! So pretty and creative, l love the wire accent too!
How cute these are, Conie!! What a fun and clever craft idea, and a great way to recycle.
Your tin baskets are such a creative upcycling project! The way you used straight-bottomed tin cans, acrylic paints, and decoupaged napkins to create these charming baskets is impressive. I love the added details like the notebook wire handles with buttons and the florist foam with flowers. Each basket has its own unique charm, especially with the different hangers and the lovely napkin designs.
So so beautiful!!!!! You are just so crafty with this basket!
Post a Comment